Showing posts with label Dina Wakley. Show all posts

Wednesday, 17 July 2019

Friends - CraftOnline Creative Team

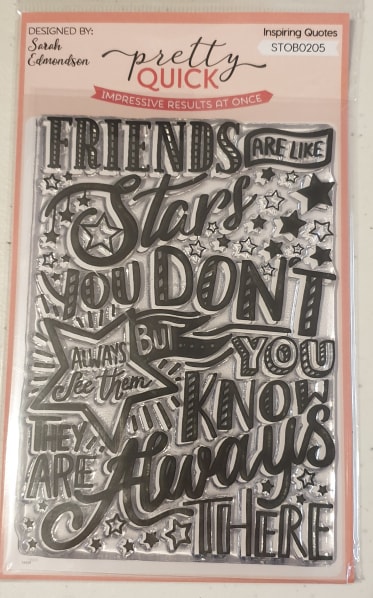
I love Typography but due to my hand issues I can't do it myself so I was scrolling through CraftOnline's shop looking at the various Typorgraphy type stamps and fell in love with the range from Pretty Quick, the "Friends are like Stars" stamp had me thinking about how it is so true of my friendships, we go for long periods of not seeing each other or chatting but when we are there and when we do get the chance to see each other it is like no time as passed.
This lead to me thinking about my friend Shirlee who makes gorgeous cakes for my family and how this stamp makes me think of her so I decided I would scrap the photo of the cake she made for C's 14th and keeping where his party was held in mind I started exploring the store for anything that would suit a computer game themed layout.


https://www.youtube.com/watch?v=UUp6dHiYtxU&feature=youtu.be

Here is my process video for this layout.    You can click on the above pic to have the video open up in YouTube or click on the below video to watch.


Close up pics of the various aspects of the layout are further down in this post.


Items used on my project.
Poppy Crafts 6x6 Textured Cardstock pad
Pretty Quick Inspiration Friends Are Like Stars stamp
To get a nice clear image from the quote stamp you will need a precision stamp tool such as the Misti or the Stampmaster Precision Stamping Tool I used.
Dina Wakely paint in Evergreen
Helmar Liquid Scrap Dots
Poppy Crafts Wooden Elements Birthday 
Helmar Acid Free Glue
Helmar 450 Quick Dry Glue
The Stamping Bella stamp I used is now sold out but I think Oddball Geek would be also suitable (still available at the time of writing this.)
Eyelet Outlet Video Game brads
Dina Wakely Washi Tape #4
49 and Market Captured Adventure 6x6 paper pad
The PhotoPlay paper I used is now out of stock as is the individual sticker sheet from Birthday Boy Wishes, however the collection for Birthday Boy Wishes is still available and has a great green paper that would work well with this layout, I didn't order it as I had Jurassic.
I stamped my images with Archival Ink in Black and Grey on watercolour paper.
I coloured my Gamer image with the following Distress Inks: Victorian Velvet, Antique Linen, Brushed Corduroy, Gathered Twigs, Black Soot, Hickory Ash, Blueprint Sketch and Chipped Sapphire.
I used the packaging technique on my cardstock and my stamped quote with Distress Ink in Twisted Citron and Mowed Lawn.
And I sealed all my items I had used Distress Ink on with Helmar Crystal Kote Fixative.


After I had all my bits I decided to add the new Poppy Crafts Paper Storage Case to keep my supplies in when working on a specific project.  And I grabbed a new pokey tool so I grabbed the Poppy Crafts Embossing Tool as one end is a pokey tool and the other is a little spatula and a T-square as I really needed these.


This quote was perfect for this layout, not just for describing our friendship with Shirlee but for describing my son's friendships as some of his friends he doesn't get to see often but when they get together it is like no time has passed.

The balloons from the Birthday Boy Wishes range were perfect to pop behind my Oddball Gamer and cute wood veneer party hat from the Poppy Crafts Wooden Elements Birthday that I painted green really helped tell the story of the layout.

And how cute are those game controller brads?


I am really happy with how my Oddball Gamer turned out, Distress Inks are a great way to add colour to stamps.

The Helmar Liquid Scrap Dots gave him the lift he needed to pop.


The grungy papers from the 49 and Market Captured Adventure 6x6 paper pad combined with the green paper and the cute balloon number stickers really helped tell the story .   Adding some doodly balloon string and doodly boarders helped things feel finished.


Creating a little quote card with the little quote that comes with the Oddball Gamer and combining it with the celebrate die cut from the Happy Hooray range that I used on my son's Fortnite layout and one of those cute game controller brads also aided in the telling of the story I think.
I think that Dina Wakely Washi was perfect for this layout.


I am really happy with how this layout turned out.  The Birthday Gamer Kit I pulled together was the perfect way to document this event and that gorgeous quote stamp really helped add that aspect of story telling regarding friendship to the layout.

I hope this has inspired you to create something.  If it has and you wind up creating a project due to this please let me know, I would love to check out your project.

Thursday, 29 November 2018

Wonderful Life - Art Journal Layout - CraftOnline Creative Team

After creating my Art Journal page inspired by Dolly earlier this year I put some thought into what works for me and having limited supplies for that spread really helped so I have decided to try Art Journalling again and use limited supplies to create each spread.  So today I am sharing with you how I created my 4th Art Journal Spread using limited supplies that I created for the CraftOnline Creative Team.

Items Used
Gel Press Gel Plate 3x5inch
Poppy Crafts 4 Birds Die Set
Studio Light Basics A6 Mixed Media Stamps
Vicki Boutin Paint Set 1
Dina Wakley paint in Eggplant
Dina Wakley paint in Peacock
Tim Holtz stencil Numberic
The pencil I used was from my stash but I think these pencils may be a good alternative, I am looking forward to ordering some to try.  General Pencils Sketch Wash 2 pack 


I love how my page turned out and I can't wait to create another spread.


Check out CraftOnline for lots of wonderful craft supplies.

Wednesday, 21 November 2018

Band Camp - Helmar Creative Team

Today I am sharing with you my Music layout that I created for the Helmar Creative Team to document a special photo of my eldest at her first band camp. 
Items used
Helmar Acid Free Glue
Helmar 450 Quick Dry Adhesive
Maggie Holmes Willow Lane 6x8 paper pad
Crate Paper Wild Heart Thickers
August 2017 kit from Scrapping Fun Kits (washi, metal flowers and metal charms)
Green Tara Flowers
49 Market Flowers
Dina Wakley paint in Eggplant
13 Arts Gold Glitter Paint

I started by getting out 3 photos I wanted to scrap - this one, a photo of my son at playing his sax with the school band at assembly for the first time and a group selfie from when my daughter toured as a cellist with Elvis to the Max when she was 19.  I then got out the last of my music themed kit from Scrapping Fun Kits last year and some left over bits from creating my Happy Days Diner layouts in September and set to work.  Once I had this all out I looked at the photos and decided the Band Camp photo was the one most suited to my supplies and started creating.
As my daughter loves purple I decided to paint the chipboard piece with my Dina Wakley paint in eggplant and then give it a coat of some gold glitter paint I got in a Dusty Attic Mystery box last month.  I dried this with my heat tool not thinking about the glitter in the pain and some of it melted so I knew when it came time to create my clusters I would have to strategically place things to hide the melted bits.
My background paper was created by cleaning up the left over purple paint by using the packaging technique (add water to the paint, smoosh a piece of plastic packaging in it and smoosh it onto white cardstock, I then smooshed/wiped the edges of the cardstock in the watered down paint that was left behind.

Once I had my background cardstock dry I started building my paper layers and adding my photo.  I used Helmar Acid Free Glue to adhere my papers, photo, chipboard and 2 of the washi pieces as it was the end or the roll and the washi was on a cardboard roll so needed some help to stick after I pulled it off.  I love this glue so much.


Now it was time to add my flowers  and metal bits to my layout.  I started by building the cluster on and around my chipboard and then balanced it out with some washi in each corner and adding 2 flowers and some metal bits to these areas.  I used Helmar 450 Quick Dry Adhesive to adhere my flowers, metal charms and metal flowers.  This is my favourite glue for adding the chunky bits to my layouts.


Once it was all down I added my title and a small amount of journalling.  This photo tells a story that needs a lot of journalling so I am going to get my daughter to write it down and add a second page to it that is just journalling.


Thank you for checking out my layout and I hope it has inspired you to create.


Wednesday, 12 September 2018

Happy Days Diner memories - Craftonline DT

Welcome to my first post for Craftonline's new team.  I am so excited to be on this team, my creativity is flowing and my brain is full of ideas.
My first idea was to record my memories of taking family to Happy Days Diner so I selected supplies that would coordinate with the colours and theme of the restaurant.


Here is a list of all I ordered that is still available.

Sound of Music Die Cut Border by Find It Trading Amy Design
Vintage Vehicles Punch Out Sheet by Find It Trading Amy Design
Bazzill Mylar Silver Cardstock
Deep Red Stamps Vintage 45 Record Stamp
NY Cake Silicone Mold - Dress
Prima Marketing Havana Mulberry Paper Flowers and Leaves
Crate Paper Maggie Holmes Willow Lane Alphabet Stickers
Crate Paper Wild At Heart Thickers Charming
Crate Paper Maggie Holmes Willow Lane 6x8 Paper Pad
Simple Stories Good Vibes Stickers
Dovecraft Accordion Sticker Flowers
Pink Paislee Colour Wash Title Stickers
Pink Paislee Nantucket Crabcakes paper
We R Memory Keepers Hello Darling Radiant paper
Vicki Boutin Mixed Media Paints Set 1
Versacolor Pigment Ink Cyan
Versacolor Pigment Ink Lilac

I decided to prep my embellishments first, starting with a cute 50's dress embellishment.  I was inspired by Farrel's Helmar blog post on making your own embellishments with Helmar Glue and a silicone mold, so I wondered if Craftonline had any silicone molds that would suit a 50's theme and I found this fantastic dress mold.
Due to my mold being much bigger than Farrel's mine would not dry properly, so I decided to try making my own paper clay with archival safe paper scraps and Helmar Acid Free Glue. 
I started by tearing up some archival paper scraps and soaking them overnight in water.  The next day I used my blender to turn it into paper pulp.  E had fun squeezing the water out of the pulp, I got him to do it as it is a great activity for Fine Motor Skills and Sensory Processing.
Once the water was squeezed out of my paper pulp I added Helmar Acid Free Glue until I had a clay consistency, then I dusted my silicone mold with corn flour and filled it with my clay and let it set over night, hitting it with my heat gun a couple of times to help it dry to be sure it dried well.
I had fun painting my dress with Vicki Boutin paints in Cotton Candy and Banana.
I decided to make a second dress but I didn't filly the middle to the top, I wanted to try doing a hollow dress.  It turned out really well, I mixed some cyan Versacraft ink with white paint to paint majority of the dress.  Then mixed some lilac Versacraft with white pain to do part of the bottom of the dress and a base on the flower and bow.  I finished the flower, bow and the very bottom of the dress with cotton candy Vicki Boutin pain mixed with white paint.  I then painted the bottom edge with white paint.  I absolutely love how this dress turned out.


When I was waiting for my glue attempt of the dress to dry I die cut this awesome die and this amazing Silver Mylar cardstock from Bazzill and I stamped my records and coloured the labels using some distress inks as watercolours.


Now that all my embellishments were ready to go I started scrapbooking.  I got 5 layouts done with all my wonderful supplies and I have lots left for more layouts.