Showing posts with label Quick Dry 450. Show all posts

Wednesday, 26 May 2021

She Baby Scrapbooking Layout - Helmar Creative Team

After what is a really long break from scrapbooking for me I am so excited to be back scrapping and couldn't resist starting with this adorable photo of my Granddaughter when she met her cousin, she was about 18 months old here and just loved to chat away in her own language but amongst her babble we heard the words She Baby so that is the title of my layout.

Now to share with you how I created it.
First I grabbed out my very limited amount of pink scrapbooking supplies and created a bit of a page kit with scraps and 6x6 papers. 
I just started gluing layers to my matted photo with my favourite glue for scrapbooking - Helmar Acid Free Glue

Then I added my embellishments, the chipboard stickers weren't sticking so I added some Helmar 450 Quick Dry Adhesive to ensure they stayed glued down for a lifetime.

I fussy cut a little onesie from some paper and adhered it down with Helmar Liquid Scrap Dots to give it some nice height.

I was really happy with my layout and then I wrote my journaling and was no longer happy so painted over my background with some pearlescent white paint and added some spats of ancient shimmery sprays that are in my stash.  I like how the journaling is still visible but no longer jumping out at you now.

Are you having a creative block like I was?  Just grab out some coordinating supplies and print a photo you love and start playing.  I find it really helps.

Wednesday, 3 February 2021

Robot Pen/Pencil Holder - Helmar Creative Team

Hubby got me a pen/pencil holder with dividers in it from the clearance section at Officeworks years ago, it had marks on it and he thought I would like to alter it but I couldn't decide on how I wanted to alter it until now, so I grabbed it out and some old thin robot scrapbooking paper I got from Spotlight several years ago and set to work.  Yay for stash busting ;)

I started by trimming 2 piece of my paper to fit.


I then ran some Helmar Acid Free Glue around the edge of one side of the pen holder and a squiggle in the middle, then spread it out with a foam brush and applied the middle of my paper to the side, Helmar Glue gives me the wiggle room needed to get a precise line up of paper to the edge and time to smooth things out.  Once I had the middle piece right I glued down the side pieces to the sides of the pen holder.

I repeated this with my other piece of paper.  I love that on one side the robots aligned perfectly and the other side it was so close that my only issue was having 2 blue together.

You could stop here but I didn't want to have 2 blue robots together so I went through my stash and found a robot die cut or sticker to adhere over the second blue robot. 

I decided to add some navy blue ribbon from my stash to the top and bottom edge of the pen holder using Helmar 450 Quick Dry Adhesive to get a strong hold on the paper, unfortunately my hand wasn't steady so I got some where I shouldn't but mistakes are just a embellishment away from being awesome.

I then started adding stars from my stash randomly over the pen holder so my robot covering the extra blue robot felt like he belonged and to cover some of my wibbly wobbly glue mistakes, then I just randomised to make it feel natural..
I adhered the die cut stars down with Helmar Acid Free glue.
I adhered the resin and sewing patch stars down with Helmar 450 Quick Dry Adhesive.


Apart from the resin and sewing patch stars everything is flat so the pen/pencil holder can sit on it's side for pens that need to be kept that way.
I love how it turned out, now to work out who gets it on their desk.  :)


 It even works as a book end ;)

Wednesday, 4 November 2020

Spring Birthdays Are So Sweet

I have a number of Birthdays in Spring so I find myself making cards when I have craft time instead of getting other projects done, but I don't mind, I am enjoying these little pops of creating.

Today I wanted to share with you the card I made for a special Birthday that occurred at the end of September.
My daughter and granddaughter both love the colour yellow so when I saw this new Butter Mini Collection from 49 and Market I just had to grab it for making my daughter a card and when I turned around at the shop they had a bulk bag of lovely big flowers that were mostly yellow and perfect for cards so I grabbed that too as I was just about out of yellow flowers, or so I thought.

To make my card I selected this gorgeous piece of paper and trimmed it to fit my card base (still working through that pack of 100 I bought 2 years ago).Then I edged my card front with Scatter Straw Distress Ink. 
I took it outside and gave it a coat of Helmar Crystal Kote Matte Varnish

I adhered my card front to my card base with Helmar Acid Free.


I selected one of the lovely big yellow flowers I bought and some smaller flowers from my stash and played around until I liked how I had them and then I adhered them down with Helmar 450 Quick Dry Adhesive.

To finish the card I added a wodden flower using Helmar 450 Quick Dry Adhesive to adhere it and then grabbed out some big number stickers to add her age.


I love how the card turned out and my daughter was really happy to receive it.


Friday, 26 June 2020

New Adventures - Helmar Creative Team

My brain was needing my to scrap so I went through my photos and found one I was in the mood to scrap and then I started pulling out supplies from my stash that might work with the photo.


I started by playing with my papers and supplies, working out what would suit this story best, once I had decided on my papers I started adhering them down with Helmar Acid Free Glue.


When selecting my embellishments I pulled out this key hole chipboard and a key.  I coloured them with metallic Distress Crayons and then gave them a coat of Helmar Crystal Kote Matte Varnish to ensure if it ever got wet the colour wouldn't run.  


Note it is best to use spray adhesives and varnish outside but the weather wasn't great so I just opened up my double sliding doors and a window.

I adhered my embellishments down with Helmar 450 Quick Dry Adhesive.


I selected some chipboard alphas, the plain ones split when I was taking them out so I adhered the layers back together with some Helmar Acid Free Glue.


When adhering the chipboard flower down I put a glob of Helmar 450 Quick Dry Adhesive in the middle and sprinkled some tiny glass seed beads to form a flower centre.


I finished off my layout with a doodle boarder to match the scrap of doodle paper.


My daughter loves the layout, she said she loves that I chose stuff to match her clothes and the tarp in addition to some house embellishments.


I hope this has inspired you to get some scrapping done and tell your stories while playing with glue and pretty supplies.


Saturday, 21 March 2020

I'm a Mermaid - CraftOnline Creative Team Project


We are all moved and 90% unpacked so I got to scrapbook for the first time in months and it was so good to be creating the way I love most again.  I have had to edit this video a lot as there were long periods of indecisiveness as I was out of my usual flow, if that makes sense, but I am really happy with how this layout of my Granddaughter posing in a Mermaid cutout turned out.


Items used in this project
Bazzill Bling Cardstock Charming
Bazzill Bling Cardstock Her Majesty
Eyelet Outlet Shell Brads
Echo Park Mermaid Dreams Collection 
Poppy Crafts A5 paper pad Mermaid
Scrapaholics Chipboard Floating Mermaid
Scrapaholics Chipboard Mermaid Kisses
Poppy Crafts die Sea Shell
Poppy Crafts die Sea Horse
Poppy Crafts A4 Cardstock Yellow Pack
Stickmaster Glue Residue Eraser
 
I cut the shell die cuts with some Kaisercraft Cardstock in my stash, it is a old colour and no longer available.  I would suggest trying Kaisercraft Oatmeal and blending inks to get the result you want.
I coloured the shell die cuts with Distress Ink in Brushed Corduroy.  I coloured the Seahorse with Fossilized Amber Distress Ink.


I glued everything down with Helmar Acid Free Glue, Helmar 450 Quick Dry Adhesive and some Helmar Liquid Scrap Dots were perfect for giving some lift and pop where needed.


You can view my Process Video by clicking on the pic or video below.
 
https://www.youtube.com/watch?v=6A3Avw45jQM

 
I love how this layout turned out.  All the little bits that say I am a Mermaid were just perfect for telling the story of the photos and prompting my memory of it.


Wednesday, 4 March 2020

Headset Repair - Helmar Creative Team


One of the ear cushions/muffs came of C's headset and with the move I did not want to be replacing his headset just yet so I decided to try fixing it myself. 
Ideally I would have like to use Helmar Fabric Glue for adhering the fabric back down and then Helmar 450 Quick Dry Adhesive to adhere it to the plastic but I packed my Fabric Glue when I packed my sewing stash so I just had the 450 Quick Dry to work with and it worked really well.


To adhere the fabric back where it has come away from the stitching I worked in small sections with my Helmar 450 Quick Dry Adhesive gluing it in place a inch or so at a time.


Once this was dry I put Helmar 450 Quick Dry on the surface for the muff and adhered it down to the headset.


I wrapped some rubber bands around it and left it to dry for longer than needed as I wanted to be sure I gave it it's best chance at holding.


All fixed.
As I am typing this he has been using his headset for a week and there are no signs of any issues.


Friday, 27 December 2019

Santa Photo 2006 - Ruby Rock-It Creative Team


When organising my photos to send them to my daughter's house I found the very first Santa photo with my youngest, he is so tiny in this photo; I just had to keep it out and scrap it and Crafters Choice Festive Pop by Ruby Rock-It was the perfect range for scrapping this photo as it has those gorgeous summer colours and I can see by how sweaty the kids are it was a hot day.


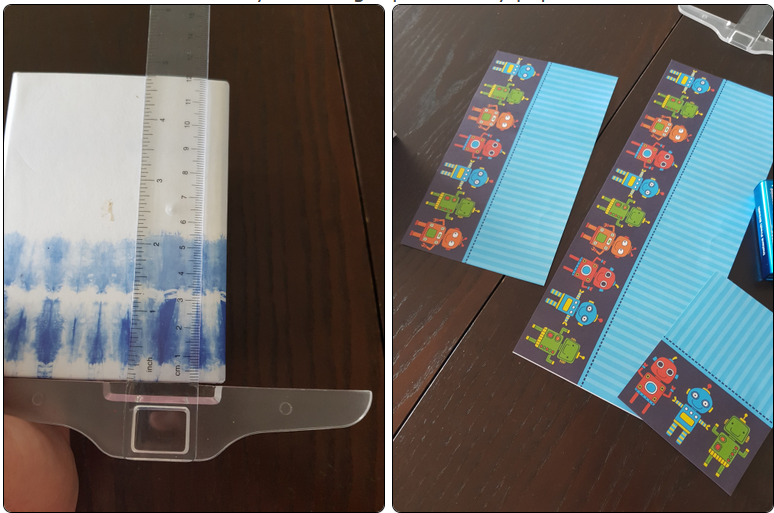
Unfortunately I had kept the photo in the little cardboard folder the photographer put it in and it had damaged the corners.

If you have any photos stored in those folders I recommend getting them out asap.


I started by selecting some papers from the Crafters Choice Festive Pop 6x6 Paper Pad to go with my photo, I based my choices on the colours of my kids clothes as I wanted to draw attention to them.

I also pulled out some cardstock from my stash in colours similar to their clothes, starting with the pale blue of my baby boy's summer onesey.  Then pulling in a pink and a green.
The cardstock I chose works so well with the papers and between them it really helps show the layout is about the kids.


Next I started playing with the way my layers would sit on my page.


Once my layering decisions were made I selectively cut my papers so save some for later as I love these ones.  Adhering down with Helmar Acid Free Glue as I cut each layer.

Then I adhered my layers down without gluing all the way to the edge in case I wanted to tuck anything in.


One of the Santa die cuts from the Crafters Choice Festive Pop Die Cuts pack inspired me to build a scene as my embellishment cluster, the present paper in the 6x6 paper pad had appropriately sized presents for this so I fussy cut a few from it.


For the Tree I pulled out a Christmas Tree Charms Creations embellishment I got last year to help build the scene.

And when I saw this dog die cut I just add to add it as it looks just like the dog we had back then.  So it feels like Miffy is part of the story even though she couldn't be in the photo.
Given how hot and sweaty the kids look I thought this chipboard piece I had in my stash was perfect for this layout. 
I base coated it in White Gesso and then coloured it with Distress Inks in Spun Sugar on the heart, Brushed Cordoroy for the Kangaroo and a mix of Weathered Wood and Salty Ocean on the words.
I used a watercolour brush and applied multiple layers of the blue and pink, drying with my heat gun between coats so as to get a more effective look.

I adhered the chipboard down with Helmar Liquid Scrap Dots to give it the lift it needed. 


I added a small piece of Santa Surfing ribbon under the chipboard. 
Later I added 2 heart stickers from my stash to this cluster.


I added some paper strips to the top left and bottom right corners and added a doodley border.


I loved my page and should have stopped here but I just had to add some journaling.


Unfortunately my journaling just didn't sit right so I had to add more papers to cover it and I just couldn't get them to look right, so I added more and then added a bigger title with some old pink alphas I had.
I didn't notice things were crooked until everything was fully dried but I am embracing the wonkyness, it can represent how we were melting in the heat.  ;)