We are all moved and 90% unpacked so I got to scrapbook for the first time in months and it was so good to be creating the way I love most again. I have had to edit this video a lot as there were long periods of indecisiveness as I was out of my usual flow, if that makes sense, but I am really happy with how this layout of my Granddaughter posing in a Mermaid cutout turned out.
I cut the shell die cuts with some Kaisercraft Cardstock in my stash, it is a old colour and no longer available. I would suggest trying Kaisercraft Oatmeal and blending inks to get the result you want.
You can view my Process Video by clicking on the pic or video below.
I love how this layout turned out. All the little bits that say I am a Mermaid were just perfect for telling the story of the photos and prompting my memory of it.
The big move is nearly over, we are just getting the last few things from the old place and finishing off the unpacking so my next CraftOnline project will be coming to you from my new set up. I am so excited.
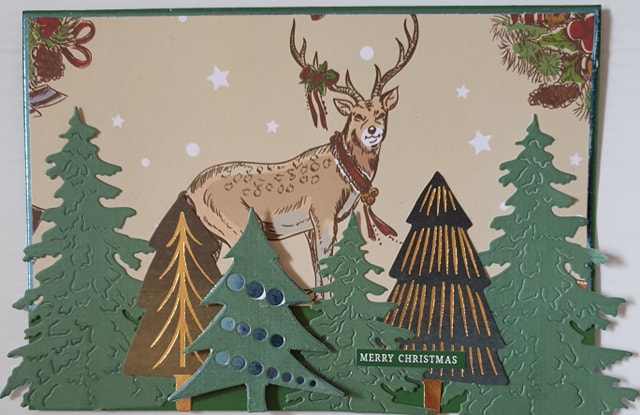
Meanwhile Today I wanted to share with you 2 Lovely Cards I created using some gorgeous Poppy Crafts Papers to have on hand to give hubby for Valentine's Day or just for the hell of it.
As we are moving and all our decorations are packed and headed to the
city that we are moving to in the first load down, it is going to be a
pretty bland Christmas here so I decided to decorate some boxes to put
small items in for my boys, they can sit on their empty bookshelf
looking cute and bringing a little touch of Christmas to their room.
I decided to make some simple cards in preparation for Christmas, so I ordered some supplies that would work for this and be great to add to my December Daily Journal stash as it is that time of year where I prepare for all things December.
Last year I did my first October Daily project, I decided to do it the way I found success with December Daily and combine it with my journal keeping. I loved how it turned out and wanted to do the project again this year but I am torn, I love doing my October Daily and December Daily combined with my journal keeping but I also really want to do a cute Halloween mini that is focused on doing Halloween prompts so I decided to prepare for both.
As I couldn't find my small Halloween stash so I needed to start from scratch this year and ordered some great goodies from CraftOnline.
I adapted Serena Bee's October Daily Prompt List to a list that better suited a Halloween specific project as the Fall prompts don't suit me since I live in the Southern Hemisphere and I wanted to save Spring Prompts for a November project or maybe for September next year. You can download a copy of my Prompt List here, I also added a October Awareness & Cultural Day List to the document, some Awareness & Cultural Days change each year so some may be incorrect for 2020.
I printed my prompt list on to vellum and distressed it with Distress Oxide in Carved Pumpkin and Seedless Preserves and added some Distress Ink in Black Soot and Peacock Feathers to give it a grungy Halloween look.
I glued some adorable pumpkin paper from Simple Stories Say Cheese Collectionto my page and adhered my list to it with Helmar Acid Free Glue, washi and stickers from the Simple Stories Say Cheese Collection.
.
I cut out the Poppy Crafts Candelabra Die from white cardstock and black glitter cardstock and then coloured the flames with Distress Ink in Wild Honey and Carved Pumpkin.
I cut the candles from the black glitter cardstock die cut and glued it to the white cardstock die cut.
I think it turned out super cute.
Click on this photo or the video below to watch my Process Video and see how I created my cover, a pocket inside the pocket, added my lists and completed my Day 1.
October Daily is a lot of fun no matter what format you choose to do it in so why no join in the fun and give it a go, it doesn't matter that it is a few weeks in you can still join in the fun. Serena has a great Facebook Group that are full of inspiration.
This year due to circumstances beyond our control we had to celebrate Father's Day with my Father In-law a couple of weeks late, so today I am sharing with you the projects I created for him for Father's Day.
I always struggle with ideas for my Father In-law so when creating a project for him gathering together a sort of kit that could work for something that suits his interests really helps me create something for him. So keeping in mind what his career was and his love of the Manly Sea Eagles I decided I would need some products that could work with a grungy sort of travel theme or some sort of Sea Eagles project.
Check out my video to see how I created a bookmark and card for the person in my life that I struggle the most for gift ideas.
I have been exploring my family history this year and even though I scrapped treasured photos of my Grandfather years ago that album was a gift for my elderly Uncle so I haven't scrapped them for myself yet. This year I have been working through getting photos of Grandad scrapped.
Grandad traveled overseas as so man young men of his generation did to serve with the Allied forces in World War 1, he was sent to France. I won't go into a lot of detail here but he fell in love with a lovely French Lady and they got married, she sadly passed away when their children were young and eventually Grandad and my Grandma fell in love and married.
Today's project I am scrapping one of only 2 photos of Grandad with his first wife Madeleine, I am unsure when it was taken but I put their wedding date on the layout as I thought it was important to record that on there.
So check out my process video to see how this layout came together and why I chose the products I chose for this project.
Have you scrapped those precious family heritage photos yet? I would love to see your projects so please pop a link to any posts you have done of them in the comments and I will check them out.
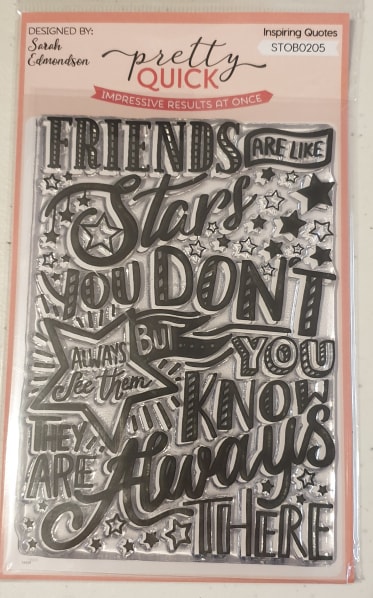
I love Typography but due to my hand issues I can't do it myself so I was scrolling through CraftOnline's shop looking at the various Typorgraphy type stamps and fell in love with the range from Pretty Quick, the "Friends are like Stars" stamp had me thinking about how it is so true of my friendships, we go for long periods of not seeing each other or chatting but when we are there and when we do get the chance to see each other it is like no time as passed.
This lead to me thinking about my friend Shirlee who makes gorgeous cakes for my family and how this stamp makes me think of her so I decided I would scrap the photo of the cake she made for C's 14th and keeping where his party was held in mind I started exploring the store for anything that would suit a computer game themed layout.
Here is my process video for this layout. You can click on the above pic to have the video open up in YouTube or click on the below video to watch.
Close up pics of the various aspects of the layout are further down in this post.
After I had all my bits I decided to add the new Poppy Crafts Paper Storage Case to keep my supplies in when working on a specific project. And I grabbed a new pokey tool so I grabbed the Poppy Crafts Embossing Tool as one end is a pokey tool and the other is a little spatula and a T-square as I really needed these.
This quote was perfect for this layout, not just for describing our friendship with Shirlee but for describing my son's friendships as some of his friends he doesn't get to see often but when they get together it is like no time has passed.
The balloons from the Birthday Boy Wishes range were perfect to pop behind my Oddball Gamer and cute wood veneer party hat from the Poppy Crafts Wooden Elements Birthday that I painted green really helped tell the story of the layout.
And how cute are those game controller brads?
I am really happy with how my Oddball Gamer turned out, Distress Inks are a great way to add colour to stamps.
The grungy papers from the 49 and Market Captured Adventure 6x6 paper pad combined with the green paper and the cute balloon number stickers really helped tell the story . Adding some doodly balloon string and doodly boarders helped things feel finished.
Creating a little quote card with the little quote that comes with the Oddball Gamer and combining it with the celebrate die cut from the Happy Hooray range that I used on my son's Fortnite layout and one of those cute game controller brads also aided in the telling of the story I think.
I think that Dina Wakely Washi was perfect for this layout.
I am really happy with how this layout turned out. The Birthday Gamer Kit I pulled together was the perfect way to document this event and that gorgeous quote stamp really helped add that aspect of story telling regarding friendship to the layout.
I hope this has inspired you to create something. If it has and you wind up creating a project due to this please let me know, I would love to check out your project.
My granddaughter loves Frozen, so much of her conversations are full of Elsa, she loves Elsa so much so with her 3rd Birthday coming up in November I thought making her her a Frozen themed mini album for her Mum to put some precious photos in would be a lovely gift she could treasure.
I set to work building a Frozen themed kit. I wanted a large variety of snowy/winter items to get that Frozen feel so this became a great way to use those winter products that are geared to people who live in areas with snow.
I started by selecting a range of snowflake dies to create die cuts for my album, selecting some gorgeous Bazzil Bling cardstock and then searching for some papers in blues and that perfect shade of purple. I added a Kaisercraft purple cardstock to my kit and then some gorgeous flowers and I called my kit ready. Here is what I ordered (I will put a asterisk next to items I used).
I started by working out sizes to cut the various pieces needed to create my interactive pages, so my finished page would be 6 inches high and 4.5 inches wide. Once I had figured this out I cut a set and assembled my prototype adjusting any measurements as needed. I have included the measurement in the video.
Once I had my prototype page set put together I wanted to see how it would look with papers on and I had this idea of creating a journey to Elsa's castle with the Disney A5 Build A Scene paper pad.
So I started by selectively cutting the pieces for my top and bottom
flaps so you would enter through them on your journey to Elsa's.
I used this winter forest paper from the pad.
When you open the top and bottom flaps you find yourself at this beautiful mountain scene.
I added the snowflakes to the inside of the top flap to hid my magnet as I forgot to add them on my prototype page before adhering my papers down.
Then when you open the side flap you find yourself at Elsa's Castle.
I wasn't thinking at the time and I didn't cut the paper, I just spread it over the flap and scored it, this has caused the page to not open properly, so if you are wanting to do something like this I recommend cutting the paper where the page folds out from.
Here is the video showing how I created my mini album.
Some other features in my album include a Shaker Pocket, which I added to the top flap of what became the front page set. I really wanted to include a Shaker pocket in some way into this album so that Ev would have some snow to watch fall.
I decorated the front of the Shaker Pocket with some of the gorgeous Poppy Crafts Snowflake Dies. And I added a border to the inside with the Find It Trading Amy Design Christmas Wishes Snowflake Border die.
I love how the album looks when you first open it. I think Miss E will love the interactivity.
After calling my project finished I decided to go back and add some snow to the front cover using the Echo Park 6x6 Stencil Winter Night and Fabre Castell Glass Bead Gel, I love the results. It looks like Anna is reaching up to the falling snow now.
I hope this project has inspired you to create something. If it has please let me know, I would love to check out your work.
Mother's Day is difficult for me since my Mum passed away but I do need to make cards with a feminine feel at this time of year and I am sure there are other people in my situation who find making a Mother's Day Card can be difficult so I like to make a more neutral card at this time of year that can fill the need for a Mother's Day Card for my MIL, or be used as a card for a friend, or a birthday card, a I miss you card, etc. So with this in mind I grabbed a heap of Poppy Crafts dies that would suit feminine cards and a 6x6 paper pad from 49 and Market (my first purchase of 49 and Market papers and oh boy are these papers stunning).
I pre-cut a heap of die cuts with my Poppy Crafts die assortment from White Cardstock so it could be coloured with Distress Inks if needed and cut 4 of this gorgeous Thinking Of You Die from Elizabeth Craft Designs and then started playing.
The gorgeous 6x6 paper pad I used was Sweet Reflections from 49 and Market.
The 6x6 and 8x8 paper pads from 49 and Market are fantastic for card making as the included laser cuts are a really good size for card making and the papers are a smaller version so the patterns suit small projects much better than a full 12x12 print.
My video today is my process of playing with these die cuts and the 6x6 paper pad which lead to the creation of this card.
Please check out the video to see how I coloured my die cuts and created my card.
I used Helmar Liquid Scrap Dots to pop up some of the lasercuts from the 49 and Market paper pad to give my cluster some dimension.
I adhered my 5 Thinking Of You die cuts together with some Helmar Acid Free Glue in a Universal Crafts Ultrafine Tip glue applicator.
I hid a smudge on my g of my Thinking Of You die cut stack with a adorable butterfly from the laser cuts.
I love how the Victorian Velvet ink goes with the pin in the lasercuts.
I hope this project has inspired you to create something.
My sister in-law's Birthday is coming up so I decided to make a quick handmade card to send to her. First I double checked with my brother in-law that her favourite colour hadn't changed and he told me it is now red, I thought it was pink, oh well. She is into positive quotes so I instead of the usual happy birthday I decided to look through my Ruby Rock-It and Bella stash for a quote that could work on a card.
I used my die as a template to trace the inside of the die onto the back of my paper and then as my hand injury is playing up at the moment I had hubby cut it out for me with a craft knife.
There were a couple of errors in the cutting of my top layer so they were what I used to inform where I would place my embellishments.
Here is a not so secret secret of mine, I rarely plan my embellishment placement as my mistakes make that decision for me ;)
I adhered everything down with Helmar Acid Free Glue, positioning my die-cut as far over to the left as I could without the cut away part of my back showing as I wanted it slightly off centre.
I adhered a gorgeous glittery gold doily from Fundamentals to the bottom left corner to ground where my main cluster and phrase/quote would be going. This helped my placement due to mistakes look more thought out and natural. ;)
I love these little doilies for card making and banners as they are a perfect size for smaller projects.
These large red roses in my stash are really old and the wire has come out of them, so knowing how old they are I put a generous glob of Helmar 450 Quick Dry Adhesive on the back where the wire came out, hoping it will go in the hole a little and sure things up a bit if needed. And then stuck them down where they needed to go.
I carefully cut the quote/phrase I wanted from the Cut Outs paper from Magic and Wonder and adhered it to my card.
I then cut up one of my Crafter's Choice bling corners and added bits to my flower clusters.
What did I say about mistakes informing my decisions.
I didn't get a photo of the original completed card as when I saw my mistake I had to act quickly and then I got caught up in adding bits to fix it.
It turns out my card base was back to front so my card was opening weirdly. The quote was the most recently stuck down item so thanking my lucky stars I used wet glue and it wasn't dry on that one item yet I carefully peeled it up and flipped things around so what was the bottom left is now the top right and glued my quote back down.
This then lead to my adding some satin ribbon roses from my stash as what was now my bottom left cluster felt like it needed more and to balance it it meant the top right cluster needed one too.
So don't panic when you make a mistake when creating, make the mistake work for you. :)
 We are all moved and 90% unpacked so I got to scrapbook for the first time in months and it was so good to be creating the way I love most again. I have had to edit this video a lot as there were long periods of indecisiveness as I was out of my usual flow, if that makes sense, but I am really happy with how this layout of my Granddaughter posing in a Mermaid cutout turned out.
 I cut the shell die cuts with some Kaisercraft Cardstock in my stash, it is a old colour and no longer available. I would suggest trying Kaisercraft Oatmeal and blending inks to get the result you want.
  I glued everything down with Helmar Acid Free Glue, Helmar 450 Quick Dry Adhesive and some Helmar Liquid Scrap Dots were perfect for giving some lift and pop where needed.


