Showing posts with label Bella. Show all posts

Monday, 7 October 2019

I Love Dance - Ruby Rock-It Creative Team

When I saw the gorgeous new Bella Mini Theme called Dance Queen I just had to scrap photos of my Granddaughter's first dance lesson so I decided to make a a TN kit from DQN69 Fusion and DQN83 On Pointe adding some lace from my stash. 
I decided to keep DQN76 Pose as a full sheet so I can use it with the left overs from this project to do a 12x12 layout for Miss E's album later.

I selectively cut words and cards from DQN69 Fusion to start my little travel kit and then I cut DQN83 On Pointe down to 2 pieces measuring 4 1/4 x 8 1/4 as I thought I might want to do a double page in my TN with the adorable photos I have.
I also added the 8 1/4 long scrap from doing this and a piece of Fusion that I didn't want the cards from to use the back side of both of these as layers as they are just gorgeous.


Now that I had everything ready to go I worked out photo placement on my 2 pages and trimmed the photos as needed.


On what would be the left page I decided to carefully adhere the photo to my matte piece and then create a pocket with them using Xpress It Double Sided Tape, so I could tuck the adorable tags from   behind them to give more layers but I would also be able to get my daughter to journal about this memory or I could journal about our Facetime chat about it at a later date.


I then added my piece of lace and selected one of the words that I had trimmed from  and adhered them down with Helmar 450 Quick Dry Adhesive.


Now to move onto the right hand page.
I worked out my layers and I knew I wanted to add a ballerina to this side so I fussy cut her out and tried to save as much as the card as I could so I could tuck it in to the layers on both pages to give more texture.

On the left page I tucked a section from the card under the lace.


I tucked a piece of the card behind the Ballerina I fussy cut from the card and slightly under the photo.

When adhering the Ballerina I just put some glue down the middle of her so she would still have some dimension.

She really is perfect for these photos of my Granddaughter, isn't she?


Finally I adhered my 2 pages into my Traveler's Notebook.
I love how the double page spread turned out.


Wednesday, 25 September 2019

Darling Girl - Ruby Rock-It Creative Team


Before I got around to doing my next layout with my kit I created for scrapping photos of my Granddaughter at a wedding earlier this year I received a lovely box full of new Bella Mini Themes from Ruby Rock-It so I decided to add the gorgeous PFF06 Fancy Florals Blossom and PFF90 Fancy Florals Bouquet to my left overs from creating my Sweet Bubbles layout as I loved the little hints of blue in the flowers of both papers, I thought it would be a good way to help pull in the blue from my daughter's hair.

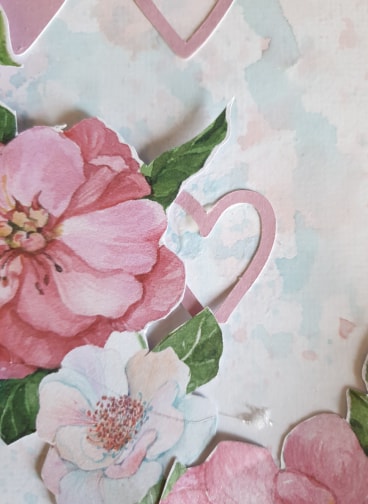
So I could use the gorgeous florals in PFF06 Fancy Florals Blossom and PFF90 Fancy Florals Bouquet I cut away a section of the papers and used my Silhouette with the Pixscan mat to cut as much as possible and then fussy cut the pale flowers as it had trouble detecting them when I used the tracing tool.


I decided to create a background on my white cardstock using the packaging technique with Distress Inks in Vintage Violet and .
The packaging technique is a really easy way to get a lovely background.  You dab your ink or watercolour paint or watered down paint onto a nonstick surface, spritz with water, place some plastic packaging and then dab the packaging onto your cardstock.


I used Victorian Velvet first, dried it with my heatgun and then added Broken China.
I love the results you get with this technique.


I was having trouble deciding which way I wanted the embellishments to be so I started with adding my heart die cut white I cut from a lilac coloured card from the Francheville Cards & Envleopes Pastel Pack to my photos and gluing them down.
I selectively cut my heart die cut to spread it as much as possible, even cutting a single heart out that would have wound up behind a photo, which I added to my florals later.


I had 2 layout options I loved and couldn't decide which was my favourite so I shared them with my fellow team members to see what they thought, I love that I can bounce creative ideas off other team members.  I also left it sitting on my desk in each design for a day and walked past it regularly to see what I liked the most.

When building my clusters I added in some of blue flowers I made when I created my kit in my previous post as I wanted to include some more blue into the project.  Instructions for these flowers are in my Sweet Bubbles layout post.

My title was going to be created with a darling wood veneer I got from a destash I bought years ago and some chipboard alphas from Ruby Rock-It to spell out GIRL.
To colour my chipboard I gave them a rough base coat of gesso and then experiemented with colouring them with Distress Inks in Victorian Velvet, Faded Lilac and Broken China.
I dabbed my ink onto my alphas, spritzed with water, dried and then used another colour and repeated until I had something I liked.


Now I was ready to stick down my embellishments, I decided I wanted to add some dimension to the layout so I glued together some scrap cardstock and adhered it to the big sections of my florals.


I tucked that single heart I cut away from my die cut into the big floral section on my layout.  I helped pull those hearts further into the layout.


I love the flowers from PFF06 Fancy Florals Blossom, they were perfect for these photos of my Granddaughter and I think if I had some of the Blush floral left they would work beautifully together so if you have some photos that need gorgeous florals then check out Blush and Fancy Florals from Bella, they are just gorgeous.

Wednesday, 9 August 2017

Kaisercraft Christmas Jewel - Loved - Get Crafty Design Team

I was so excited when the postie delivered my first Design Team pack from Get Crafty Friday, I couldn't wait to get creating with these goodies.


As many of you know I love purple so when I saw this gorgeous range from Kaisercraft called Christmas Jewel I was so excited to see that it was such a versatile range.  Many of the papers have sides that are not distinctly Christmas so it suits doing other layouts really well.

From my stash I pulled out my purple flowers, purple Bella chipboard buttons and left overs of my Scrapping Fun Kits April Kit to have withing easy reach while creating so I could find things that went well with the papers easily.  I also wound up using a Journal tag from a pack from D-lish Scraps.

I decided to get another layout in the 8x8 album that I am doing for my daughter done.
For details on how this layout came together check out my process video.


I just love the purples in this range.
This love chipboard  is the piece I saved the other week when doing the August Get Crafty Sketch and I only needed the circle part of the 2Crafty Chipboard.


I love the purple and silver spots on this paper, it went so well with other supplies I had in my stash.


When I saw this Christmas Tree feature paper I knew I wanted it for my December Project this year, even though it is a very Snowy/Winter Christmas feel it is perfect for my album as I started incorporating some German traditions that I experienced as a child into our December each year so I think this will be a great page to be part of the spread about this.  So after completing my 8x8 I cut it down, punched the needed holes and added it to my album ready for my DD preparations.  Keeping this in mind I was careful when cutting the paper I needed for my 8x8 from it.


I really love the versatility of this range and it is great to have more purple choices as it is usually so hard to get in scrapbooking supplies.  So think about the layouts you could create with this range that aren't necessarily Christmas layouts, you may be surprised how many layouts this will suit.


Sunday, 7 August 2016

White with 1 August Challenge

White with 1 this month features my favourite colour this month, so August is the perfect month for me to join this Challenge for the first time.
First I gathered together all my embellishments that may suit it and the photo I wanted to scrap with this layout.  As I chose a photo for my daughter's pregnancy album it meant I needed to do a 8x8 layout which adds to the challenge as it limits space.


When selecting paper I chose a piece of 6x6 paper from Kaisercraft Ivy Crush range in the shade of purple for the challenge,  I also chose this piece that has a lacquared print on it and coloured it with Distress Stain in Seedless Preserves to coordinate with the colours of the layout.


I also coloured one of the smaller butterfly stickers from Kaisercraft Ivy Crush with Distress Stain Seedless Preserves.


I used more of the vintage lace from my Mum's sewing stash, doily flower from the crocheted table runner, a quote tag from Kaisercraft Ivy Crush and chipboard buttons from Bella.


I swiped some Distress Stain in Seedless Preserves on my white cardstock before adhering things down so the swipe marks would poke out from the photo.
I added 3 of the little circles that I popped out of the chipboard buttons on the bottom right corner.