Showing posts with label Handmade Gifts. Show all posts

Friday, 27 September 2019

DIY Dice Tray - Helmar Creative Team

Today I have a quick DIY gift idea for the Board Game lover in your life, or you could just make it for yourself.   A cool Dice Tray, the boys made these Dice Trays for their Dad for Father's Day and I thought I would share how they created them so those of you needing gift ideas for the Board Game loving people in your life can get started creating gifts for Christmas if you wish.

The purpose of a Dice Tray is to not lose you dice under the couch and to reduce problematic rolls like the dice being cocked, etc.  Keeping this in mind I kept my eye out for some nice deep frames that weren't too big so they didn't occupy too much table space.  I would have loved to upcycle a old frame but after 15 months of scouring op-shops I had no luck so bought the frames from The Reject Shop and I am trying to come up with something to use the glass for or find a artist who will use it and give it to them.
So here is what you need.
Helmar Fabric Glue
Helmar 450 Quick Dry Adhesive
Felt in your preferred colour
2mm and/or 3mm Craft Foam
Deep Photo Frames
Scissors
Pen or Pencil.


Remove the back piece from the frame, this is the part you will be working with. 
You won't need the glass or hanging hardware so save them for something else if you wish.
Place the back piece down on your foam and trace around it.  
Cut on the line. 
Do the same with your felt.

Run some Helmar 450 Quick Dry Adhesive around the outer edge of your back piece and a squiggle in the middle and adhere your foam down.


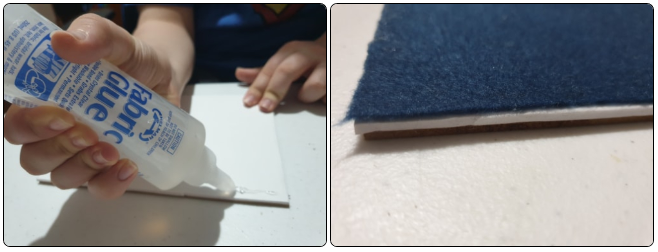
Once your Helmar 450 Quick Dry Adhesive is dry run some Helmar Fabric Glue around the edge of your foam and adhere down your felt.
Put your frame back together without the glass or hanging hardware and you are ready to role.
E made a mini Dice Tray with Green felt so our awesome DM has something a bit more compact when needed.    He had to test it out with his favourite D20 and he was pretty happy with his role.

Why not make a Dice Tray as a gift for the board game loving person in your life?  They will love it.


Wednesday, 18 September 2019

Father's Day Card and Manly Sea Eagles Bookmark - CraftOnline Creative Team

This year due to circumstances beyond our control we had to celebrate Father's Day with my Father In-law a couple of weeks late, so today I am sharing with you the projects I created for him for Father's Day.

I always struggle with ideas for my Father In-law so when creating a project for him gathering together a sort of kit that could work for something that suits his interests really helps me create something for him.  So keeping in mind what his career was and his love of the Manly Sea Eagles I decided I would need some products that could work with a grungy sort of travel theme or some sort of Sea Eagles project.


Check out my video to see how I created a bookmark and card for the person in my life that I struggle the most for gift ideas.

https://www.youtube.com/watch?v=dO846znZJPg&feature=youtu.be


Items used.
Poppy Crafts Stitched Labels die set
Poppy Crafts Gear Set 3 die set
Poppy Crafts Gear Set 2 die set
49 and Market Captured Adventure 6x6 paper pad
Poppy Crafts A6 Cards and Envelopes Kraft
Poppy Crafts A4 Kraft Cardstock
Poppy Crafts A4 White Cardstock
The Stickmaster Heat Resistant Double Sided Tape
X-Press It Double Sided Foam Tape
Universal Crafts Blending Tool
Tim Holt Distress Mini Ink Pad Storage Tin
Mini Distress Ink Walnut Stain
Mini Distress Ink Aged Mahogany
Mini Distress Ink Brushed Corduroy
Mini Distress Ink Hickory Smoke
Helmar Acid Free Glue
Helmar Liquid Scrap Dots
Helmar Crystal Kote Matte Varnish
Universal Crafts Embossing Tool
Dorland's Wax Medium


The X-Press It Double Sided Foam Tape and Helmar Liquid Scrap Dots really helped give my card dimension.
The Helmar Crystal Kote Matte Varnish sealed the distress inks so they won't run if the bookmark or card were to get wet.


The Dorland's Wax Medium sealed my alphas beautifully, they aren't coming up now.


I love how the card and bookmark turned out.

Monday, 14 May 2018

Explore Space Canvas - Helmar Creative Team

I wanted to do a scrapbook layout with a galaxy background and using this cute iron on patch set from my stash and some chipboard stars to build dimension to the layout.  It quickly changed to me reusing a old canvas that the kids tried to paint a Christmas tree on years ago to create a item suitable for wall decor for a child's room.
I love painting Galaxy/Nebula paintings as the technique used is one that I am able to easily do with my hand issues.

I started by coating the old canvas with a coat of Colour Blast Heavy Black Gesso, I got great coverage from this Gesso.

While the Gesso was drying I coloured some gauze in the colours I wanted the nebula to be as I wanted to experiment and see if I could add it to the painting to give the nebular dimension. 
I simple dabbed some distress ink on my craft sheet added water and rubbed the gauze in it.  I repeated with some Colour Blast Mica Powder in Wisteria.
There are not photos of this attempt as it really did not work so the gauze quickly became another aspect of the piece.

Once dry I wrapped some space themed washi from Scrapping Fun Kits around the outside of the canvas on the edge using Helmar 450 Quick Dry Adhesive to ensure a strong stick as the adhesive on the washi would not be enough to get a long term hold.


Next I started working on my Galaxy but gradually sponging coloured paint onto the canvas in a sort of nebula shape.  I used some old paints in red, yellow, purple, blue and white.  I blended the red and yellow together where needed to get hints of orange.
Then I flicked paint with a brush all over the canvas mainly in white but also some of the blue and purple to add to the space effect.


Once the paint was dry I adhered some of the coloured gauze behind the rocket ship patch then I adhere it and the planet patch that came in the set to the canvas with Helmar 450 Quick Dry Adhesive.


Finally I used the last of my Studio Calico chipboard stars I got from My Scrapbook Room randomly on the canvas using the Helmar 450 Quick Dry Adhesive.


Once everything was dry I gave the entire thing a coat of Crystal Kote Gloss Varnish to seal it all and protect it.  I sprayed a bit closer in some spots to see how that would affect the finish, I was hoping it would enhance the night sky feel of the piece and it did.


I love how it turned out.


Saturday, 21 May 2016

Upcycled Fauxdori Traveler's Notebook from Enid Blyton Book

My lovely friend Alicia loves Enid Blyton so when I found this very damaged Enid Blyton at a op-shop that had torn pages, scribble in marker throughout, etc I knew just what I was going to do with it.
I carefully removed the pages, ran some strong wide tape down the inside of the spine, lined the inside with some scrapbooking paper, used my Crop-a-Dile to set some eyelets and a piercing tool for the middle hole.
I am pleased with my first attempt at upcycling a book into a Fauxdori.

I found this dragonfly charm and attached it to the elastic as it had pink beads and she loves pink.

The paper has a distressed feel that suited this rather distressed book.

I am now on the look out for more books that will suit this type of project.

Thursday, 31 December 2015

Handmade 6x6 Mini Baby Boy Album

I had so much fun making this album for my nephew.
I followed a My Sister's Scrapper tutorial, link is in the description of the Video of the finished album.
A handmade Baby Album needs it's own handmade gift box.

The top of the gift box.
The side of the lid.

The finished spine of the album.
This is a pic of the cover before I finished it, please see the video linked above for the finished cover as I added another fussy cut piece.
I couldn't get the die cuts from this range so I fussy cut from a sheet of the paper, backed them onto cardstock and fussy cut again, which took a while with my hand issues.
This is a pic from my work in progress of the inside cover, you can see the finished project in the video.
The page on the right I cut a second piece of paper so it would line up with the paper underneath.
Inside of the fold out.
I stuck this pocket scrapping card down so it would form a pocket as seen in the video.
I later added a badge/flair to the top corner of the right hand page.
I adhered the pocket scrapping card down so it will form a pocket.
I just love these hand and foot print die cuts, so cute.
A teddy bear charm from a pack I collected when making myself a Firefly themed charm for my Filofax.
I finished these pages off with Yellow photo mats.
The buttons from my stash went so well with these stickers.
Couldn't resist creating a clothesline with these cute stickers and some tiny pegs over a journalling card.
I created a pocket behind the 2 pocket scrapping cards and another small pocket for the journalling tags with the top pocket scrapping cards.
Another pocket created with the pocket scrapping cards.
I added dimension with the hexagon die cuts, they are larger than the hexagons on the card but I love the effect, they are adhered down with foam tape.
I didn't get to finish the inside of the cover but using the BABY BOY die cut blocks with some foam tape worked a treat on the back page.


I really loved creating this and can't wait to create another mini album.