Showing posts with label card making. Show all posts

Wednesday, 4 November 2020

Spring Birthdays Are So Sweet

I have a number of Birthdays in Spring so I find myself making cards when I have craft time instead of getting other projects done, but I don't mind, I am enjoying these little pops of creating.

Today I wanted to share with you the card I made for a special Birthday that occurred at the end of September.
My daughter and granddaughter both love the colour yellow so when I saw this new Butter Mini Collection from 49 and Market I just had to grab it for making my daughter a card and when I turned around at the shop they had a bulk bag of lovely big flowers that were mostly yellow and perfect for cards so I grabbed that too as I was just about out of yellow flowers, or so I thought.

To make my card I selected this gorgeous piece of paper and trimmed it to fit my card base (still working through that pack of 100 I bought 2 years ago).Then I edged my card front with Scatter Straw Distress Ink. 
I took it outside and gave it a coat of Helmar Crystal Kote Matte Varnish

I adhered my card front to my card base with Helmar Acid Free.


I selected one of the lovely big yellow flowers I bought and some smaller flowers from my stash and played around until I liked how I had them and then I adhered them down with Helmar 450 Quick Dry Adhesive.

To finish the card I added a wodden flower using Helmar 450 Quick Dry Adhesive to adhere it and then grabbed out some big number stickers to add her age.


I love how the card turned out and my daughter was really happy to receive it.


Tuesday, 4 August 2020

Quick Birthday Card

June and July are hectic Birthday months for me so I need to make some quick cards.  Today I wanted to share with you the cards I made for my nephew's Birthday

My nephew loves cars so I wanted to make him a car themed card, I had this car themed 3D punch out sheet in my stash so decided to use this as the inspiration for my card.  I carefully popped out the layers and then adhered them together with Helmar Liquid Scrap Dots, they really are perfect for this as I can adjust the height of my layers by using this awesome adhesive.

20200716_103820 20200716_103820
20200716_104348

I set this aside to dry and started working on my card base.
I cut a piece of red A4 cardstock in half and then scored and folded that piece in half.
Then I went through my stash and found a cool piece of black embossed paper, trimmed it to size and adhered it down with Helmar Acid Free Glue.

20200716_180346

To finish off my card I adhered my 3D car to my card base with Helmar Acid Free Glue and then raided my alpha stash for a nice big number 5 and some alphas to spell out Happy Birthday.   Tip stick down your alphas with Helmar Acid Free Glue to ensure longevity and if you have the time give your card a coat of Helmar Chrystal Kote Matte Varnish to protect it from anything little fingers get on it.

20200716_145905 20200716_145905

20200716_145905

I am really happy with how my card turned out and best of all my nephew loved it. 
Badge with my name

Friday, 21 February 2020

2 Lovely Cards - CraftOnline Creative Team

The big move is nearly over, we are just getting the last few things from the old place and finishing off the unpacking so my next CraftOnline project will be coming to you from my new set up.  I am so excited.
Meanwhile Today I wanted to share with you 2 Lovely Cards I created using some gorgeous Poppy Crafts Papers to have on hand to give hubby for Valentine's Day or just for the hell of it.
Items used on this project
Poppy Crafts Sweet Heart 6x6 Paper Pad
Poppy Crafts Valentine's Day Washi Tape
Poppy Crafts Pink Cardstock Pack
Poppy Crafts Citrus Burst Cardstock Pack
Helmar Acid Free Glue
Helmar Liquid Scrap Dots 


You can view my Process Video by clicking on the pic or video below.

https://www.youtube.com/watch?v=Gf9u6slz5uc


I love how my cards turned out, I think they suit a wide range of occassions.  I hope they inspire you to make something.

Thursday, 26 September 2019

A Stranger Birthday Afternoon

My daughter loves Stranger Things so when it came to a Birthday Card for her I decided to make her a Eggos themed card.

I started by designing a cut file for it that would enable it to look like 2 eggos were overlapping.
I cut 1 base, 3 of the full waffles and 2 of the waffles with a section missing.

I then coloured the base and top layers randomly with Distress Ink in Wild Honey and Fossilized Amber to give it a more toasted look.


I then started gluing my layers together with Helmar Acid Free Glue.


I then added my eggos to my card base.


My next step was adding the red lettering for Eggo, I grabbed out some really old Creative Memories alphas and added them to my card.

I then sealed my card with Dorlands Wax Sealant to ensure the alphas wouldn't peal off.


As the boys and I were traveling down on the train for a week long stay with my daughters the week before my daughter's birthday I decided to just pack the card and instead organise everything else once down there.  I arranged some awesome Stranger Things and Spiderman cupcakes to be made by her housemate who has her own cake decorating business in Brisbane (My Sweet Addiction)
I also got my eldest to pick up Christmas lights and I used her scrapping stash to make a box to fit a pack of waffles for a mini themed afternoon tea with just us and her housemates as she prefers small events.


Here is a quick how to of how I made the box.

I glued 2 sheets of yellow cardstock together with a line of Helmar Acid Free Glue.


I then measured my waffle pack and cut my cardstock to size and then scored it which was difficult as my daughter's scoring tool was missing so I had to use the back of a knife and her trimmer.  I did slip and cut through one section so I just taped it back together with washi tape.
I then cut down the sections that would form the ends.


I then used my Helmar Acid Free Glue to glue my box closed around my waffles.


The card turned out so cute.


At the afternoon tea I sat the card on top of the box so it looked like a box of Eggos.


Wednesday, 18 September 2019

Father's Day Card and Manly Sea Eagles Bookmark - CraftOnline Creative Team

This year due to circumstances beyond our control we had to celebrate Father's Day with my Father In-law a couple of weeks late, so today I am sharing with you the projects I created for him for Father's Day.

I always struggle with ideas for my Father In-law so when creating a project for him gathering together a sort of kit that could work for something that suits his interests really helps me create something for him.  So keeping in mind what his career was and his love of the Manly Sea Eagles I decided I would need some products that could work with a grungy sort of travel theme or some sort of Sea Eagles project.


Check out my video to see how I created a bookmark and card for the person in my life that I struggle the most for gift ideas.

https://www.youtube.com/watch?v=dO846znZJPg&feature=youtu.be


Items used.
Poppy Crafts Stitched Labels die set
Poppy Crafts Gear Set 3 die set
Poppy Crafts Gear Set 2 die set
49 and Market Captured Adventure 6x6 paper pad
Poppy Crafts A6 Cards and Envelopes Kraft
Poppy Crafts A4 Kraft Cardstock
Poppy Crafts A4 White Cardstock
The Stickmaster Heat Resistant Double Sided Tape
X-Press It Double Sided Foam Tape
Universal Crafts Blending Tool
Tim Holt Distress Mini Ink Pad Storage Tin
Mini Distress Ink Walnut Stain
Mini Distress Ink Aged Mahogany
Mini Distress Ink Brushed Corduroy
Mini Distress Ink Hickory Smoke
Helmar Acid Free Glue
Helmar Liquid Scrap Dots
Helmar Crystal Kote Matte Varnish
Universal Crafts Embossing Tool
Dorland's Wax Medium


The X-Press It Double Sided Foam Tape and Helmar Liquid Scrap Dots really helped give my card dimension.
The Helmar Crystal Kote Matte Varnish sealed the distress inks so they won't run if the bookmark or card were to get wet.


The Dorland's Wax Medium sealed my alphas beautifully, they aren't coming up now.


I love how the card and bookmark turned out.

Sunday, 8 September 2019

4 Farewell Cards

My husband and I were attending a party for 4 of his colleagues who were leaving after many years at his workplace, 3 of them I had worked with when I worked there 15 years ago.  Hubby wanted to give them a card each with a personal message from himself so I decided to make a set of 4 cards for him.

I had no idea what I was going to do so I started by designing a cut file for the word Farewell to use on my cards and cutting it from white cardstock 4 times.
You can download a copy of my cut file here.  Please if sharing the file or a project using the file link back to this post rather than just giving someone a copy of it.

I grabbed out 4 white card bases and initially I grabbed out a assortment of scraps, flowers, ribbons, lace and die cuts but the variety was making things harder than it had to be so instead I got out my December 2018 kit from Scrapping Fun Kits that was a pink with hints of black and white kit, having everything coordinating really helped get these cards done quickly.  I added some white flowers and a scrap of cream paper to this and set to work.

I cut my papers too size and then just built each card individually, first adding a piece of ribbon or lace and then adhering my die cut onto these with Helmar Acid Free Glue.

Once my word was down I added my flowers with Helmar Premium Craft Glue.

Once the card fronts were dry I adhered them to my card bases with Helmar Acid Free Glue.

I love how they turned out and they were so quick and simple to make once I reduced down my options so I wasn't overwhelmed with choice while creating.

Wednesday, 28 August 2019

4 Super Projects - Ruby Rock-It Creative Team


I was so excited about the new Superhero range from Bella, I had so many ideas in my head for projects to do with it, I got to a short list of 4 projects and decided to challenge myself to get all 4 projects out of the 3 sheets I had plus some Francehville Cards from the Primary & Basics packs and a sheet of Red Gallery R1998 Crinkles.
To get as much out of these papers as I could I had to do a fair bit of selective cutting, but it was so worth it.

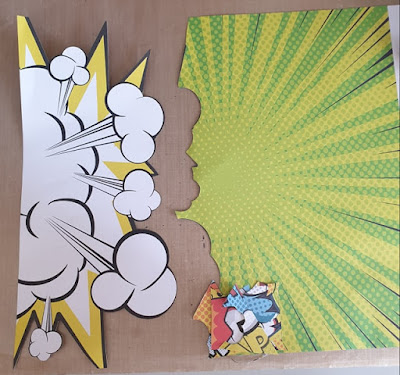
The first thing I did was cut out this awesome section from THE623 Superhero Collage paper


Next I cut out the 3 items I definitely wanted from THE647 Superhero Jigsaw paper.


I then matted my photos with cards from Franceville Cards and Envelopes boxes in Basics and Primar and then cut out some cityscapes and comic splats and title card from these also using my Silhouette Curio to do the die cutting.

I created a starter stack for 4 projects.  I have the start of 2 12x12 projects, a Father's Day card and a 5x8 journal tip in for my A5 journal.


I then worked out placement for the 2 12x12 layouts on the papers that would be their background, flipped it back over the the wrong side and recreated the placement so I could trace around it with pencil and cut away inside my pencil line to ensure I got as much of  each paper to cut pieces from as possible.  


I got a nice big piece from the THE630 Superhero Splat paper, so there will be lots of cute heros to decorate with.  :)


Now that I had my lines on THE647 Superhero Jigsaw paper I was able to go through it and get as many bits as I possibly could from it.


Time to use my Pixscan mat with my Silhouette Curio to die cut all those superheros.


I decided to work on my favourite little Bat Girl's layout.
I adhered the big fussy cut piece from THE623 Superhero Collage and her matted photos down, just gluing things where they touched.
Filling in gaps with comic sections cut from THE647 Superhero Jigsaw paper and from splat style words from THE623 Superhero Collage paper.

I loved this Yeah for my Bat Girl layout but it was missing part of it due to how I had to fussy cut it, so I cut another cloud bit from another partial of it and adhered them together to complete it.

I added a little word from THE647 Superhero Jigsaw paper to hide the seam in my Yeah and it is perfect.


I cut my layout down to 11 and 13/16 inches and mounted it on some white cardstock which I had cut away the middle leaving a 1.5 inch frame and called this layout done.


The second project I worked on was my Free Comic Book Day layout, I used the comic strip sections I had cut from THE647 Superhero Jigsaw paper to give it a comic feel.


I used my cityscape to hide the narrow bit I cut away at the bottom earlier to get the tiny words I needed for my other projects.  I love how this little scene sits at the bottom.


I then cut it down 3/16 of a inch and gave it a boarder by mounting it on a 1.5 inch white cardstock frame and running a black marker around my decorative paper.
And finished it off by adding part of one of my heroes flying to the city with a boom to hide that part of his head is missing as he was from the edge of the paper.

Now it was time to do my third project.  I decided my Father's Day card would be next as my journal tip in can just be made with minimal supplies but I wanted to have more items to work with for the card.
I cut a piece from my left over piece of THE623 Superhero Collage paper to fit my card base with a slight edge of the card base showing.


I then used the Super Dad card from THE647 Superhero Jigsaw paper, my left over cityscape die cut, some extra splats I cut from left over bits from the Franceville Cards I had been using and a hero and arrows from THE630 Superhero Splat paper. to cover my missing section and build a card that looks finished.


Now it's time to do my fourth project, a tip in for my journal.  I am using a A5 journal this year so that means I can make a bit bigger tip in this time.  I went with a 5x8 base.
When doing this I realised I had forgotten to use Red Gallery R1998 Crinkles paper which I had included as it reminded me of a superhero cape so I was really glad to have a full sheet to play with as I couldn't get a 5x8 base piece from any of the other papers.

I trimmed a 1 1/4 x 8 inch piece from the last of the THE647 Superhero Jigsaw paper and adhered it down the right side.

I then adhered my photo down and tucked in the partial comic strip card I had remaining above my photo.

Added a zap, the small word that I selected specifically for this photo and then chose 2 heroes that remind me of my sons to create a cluster down the bottom left.

This is now ready to add my journaling to the back of it and tape it into my journal.


And this is all I have left.  I actually think I could squeeze one more card out of this but I will save that for later.
This range really is amazing value given how much you can create with just 3 papers.