Tuesday, 20 November 2018

Doctor Who Celebrations - Other Decorations and Food

I thought I would share with you the rest of what we did for our Dr Who Mini Party/Morning Tea.
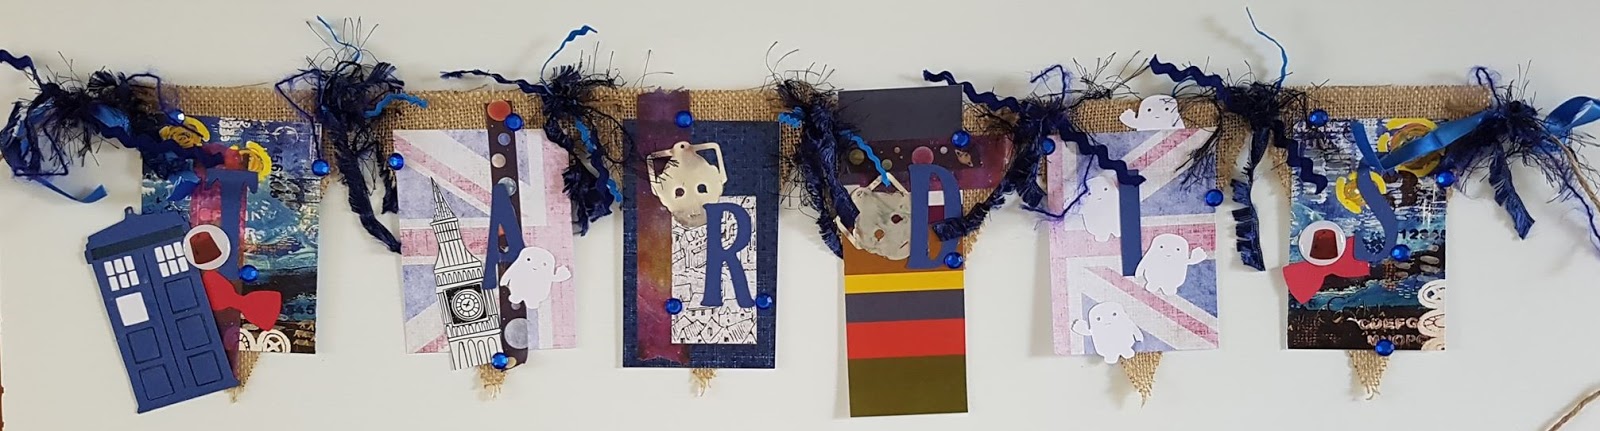
You can find details on creating my Banner here and my Weeping Angel Decoration here.

For our themed days this year I have set a budget cap of $50 including food for each day, this will be a yearly budget so the decorations will grow each year and this year is about starting small, so this is also a good lesson on budgeting and bargain hunting for the boys in addition to creating some fun memories and making stuff.

Dr Who is a great themed day for us as we can get 3 for 1 out of it - The Season Premiere, The Anniversary/my granddaughter's birthday and what was the Christmas Special which is now a New Year's Special.  While I will miss the Christmas Special it will be nice to have some Whovian fun on New Years.
Anyway on to the other decorations and the food from our little party for the season premiere.

On a day that Lincraft was having 40% off storewide I went browsing for anything that might suit a Dr Who or any of the other themed days I have been thinking about doing.
They had some TARDIS blue decorative mesh on clearance for $2.99 so with the 40% off that came to $1.80, I grabbed the cheapest of the large wreath hoops which also went through at $1.80.  Bargain.


I have seen so many wreaths on Pinterest and in May May Made It's group, it has been on my craft to make wish list for a while so I thought it would be a great project for little fingers that need to work their muscles and improve their fine motor skills.  There are a few tutorials on YouTube for making decomesh wreaths.

So during the first week of the holidays the boys had some fun cutting the decorative mesh into  lengths and tying them to the hoop.  We also discussed whether we wanted to leave it plain or add something Whovian to it.

However one roll of mesh was not enough for my wreath hoop so I went back and got a roll of TARDIS blue with gold ribbon (it is pretty cool ribbon, some angles it looks gold and some it looks blue) to fill it out a bit and used the 4th Doctor scarf I found at the op-shop months ago for the other half.  I am going to add more mesh later.

When I add the mesh to the second half I will do a quick tutorial for you on how I did it.


After making 1 wreath with this stuff I will never do another, it frays so easily and is plastic and not environmentally friendly at all.  The boys art group is doing a art show on Plastic Polution in the Ocean so I donated the scraps to the class for the kids to use as pollution in their paintings if they wished.


If you are local if you can please go check out the Art Show, the students have put many hours into their art works.

Anyway back to our Dr Who Celebrations


Our other decorations included these cute glass bowels, plate and a pale blue tablecloth from my local St Vincent De Paul op-shop.  

And I bought a silhouette cut file to make a TARDIS tealight lantern; it did not come with instructions and after putting one together I decided I have to do some adjusting to it as it just doesn't work for my brain.

And I just had to create a Big Ben tealight lantern so bought the cut file for this project and had some fun cutting it out of beige cardstock and colouring it with distress ink to give it a aged feel.  


We also made some red cups look like Fez and some red serviettes into Bow Ties, once it all came together the table look great.  I hung a sheet behind it to add to the ambience.


The boys and I gathered our ingredients for creating Time Vortex Cookies, Jammie Dodgers and Adipose Marshmallows and started creating our food for our special morning tea.


The food colouring pens I bought for the Marshmallow Adipose came in handy for Halloween hot chocolate.


I got the Table semi-ready before the kids woke.
How awesome does my Angel look?  I am so proud of her.


ABC iview means we can watch Dr Who at a time that suits us, so we watched it in the morning before the boys classes started.


Though our Time Vortex Cookies were a Pinterest disaster we still enjoyed them.  We also had some bananas, jelly babies and fish fingers in custard as part of our morning tea spread.


I waited to put the fish fingers in the over until just before the boys had their morning tea break so they would be fresh, I poured the custard just as they came out.

We found Fish Fingers in Custard to be pretty Yummy, definitely worth giving them a try.


E and I wore our Cosplays, E was the 10th Doctor and I was his companion Donna Noble (I love Donna so much).


After Morning Tea I got really brave and made a Souffle for the first time in my life and it actually turned out ok despite making 2 mistakes while making it.   It was so Yum and light and fluffy.  A great lunch for the day.  
Unfortunately I didn't take a photo but why not be brave and give it a go cooking Cheese Souffle, this recipe was very user friendly and it was Yummy.

We had a great time at our Dr Who Day and can't wait to get all our supplies out for another Whovian themed day soon.


Wednesday, 14 November 2018

Dr Who Celebrations - Weeping Angel Doll Decoration - Helmar Creative Team

I decided earlier this year to create more fun in our lives.  At first I thought about doing themed days for their educational, cultural and awareness raising value, I also realised making the decorations and food could be great for fine motor skill and sensory activities for myself and the boys.
With this in mind I have been trying to think of themed things we could do and Dr Who is just perfect for this need, and we could get 3 days out of it.  Dr Who Day could be the season premiere, the anniversary aka my Granddaughter's birthday and Boxing Day (our favourite Dr Who Day each year).  So I picked out a few ideas that would be things myself or the boys could do and one thing I have wanted for a long time is a Weeping Angel decoration so I decided to make a Weeping Angel decoration that could either stand on the table or be a tree topper.
I found a few tutorials online for converting a barbie into a Weeping Angel and I asked my friend that lives in the town that has my closest Kmart to pick up one of their $4 barbies for me when he was next in Kmart, as I couldn't get to the op-shop at the time.  About a hour later he sent me pics so I could choose one.
All the tutorials either melted the elbows and wrists or used hot glue, I didn't want to melt plastic as this releases toxic chemicals into the environment and I prefer using Helmar glues over hot glue as I tend to get glue all over me when I craft and Helmar doesn't burn.  So I planned out what glues I would try for which part and set to work once my friend dropped off my $4 knock off barbie.

Items needs
Cheap barbie type doll
Craft Foam
Gauze
Thin ribbon scraps
Pewter Spray Paint
Sheet of cardstock
Helmar Fabric Glue
Helmar 450 Quick Dry Adhesive
Helmar Foam Glue
Stanley Knife
Cutting mat
Scissors
Embossing stylus
Marker for drawing your wing outline.

I decided to try using the doll's hair to create the Angel's hair instead of the method used in all the tutorials and absolutely love the finished look, it was certainly much easier than the other method.
I simply put her hair into a ponytail at the right spot on her head (her original style was too high), then I wound the hair around into a bun shape and gluing with fabric glue as I went.  I finished it off by trimming the hair and using fabric glue to kind of seal the shape where it was trimmed.  I thought that once it was painted you wouldn't be able to tell.
I finished it off by adding a skinny ribbon around her head with Helmar Fabric Glue.


Now for the arms I simply cut them at the elbow with a stanley knife and glued them at a right angle using Quick Dry 450, as the edges don't meet very well I let it have a long drying time and then used some polymer clay to fill in gaps and sort of stabilise the joint.
I didn't need to do anything to the wrists as the plastic is a soft plastic so her wrists and fingers were bendy and a small amount of glue where the fingers need to attach was all that was needed.


For the dress I started by making a cardstock cone, I simply wrapped some cardstock around at her waist into a cone shape, glued it at the seam with Helmar 450 Quick Dry Adhesive as that is what was on my desk and open.  And then trimmed the base of the cardstock level with her feet.
I then cut some white tulle and cut head and arm slits in it.  Put this over her and tied some ribbon around her waist.  I added in sections of tulle to cover her cardstock base.
I eventually realised that because I had bought Pewter Paint not Stone or Granite the tulle would show as tulle so after putting her wings on I added some gauze by selectively gluing pieces over her and then tieing another skinny ribbon around her waist.

For the wings I used some 1mm white craft foam.  I cut a rough angel win shape and drew in the feathers on both sides with a embossing stylus. 
I also cut 2 small bits for the tops of the wings.  I glued these onto the base with Helmar Foam Glue, and let dry.
I attached the wings to the doll with Helmar 450 Quick Dry Adhesive.


I took her outside and spray painted her with the Pewter Paint, taking her upstairs to dry on the railing of my back landing.


I love how she turned out and because I used Helmar I know she will last.

Check out how cool she looked on my Dr Who themed table.


Tuesday, 6 November 2018

Dr Who celebrations - TARDIS Banner - Scrapping Fun Kits DT

I am loving doing themed days with the kids, it is a great way to get E doing fine motor skill and sensory stuff.  I am making a couple of decorations myself and Today's post is one of those projects.

I really wanted a banner to hang for the significant Who days, aka season premiere, anniversary/my granddaughter's Birthday and the Christmas special/Boxing Day and this kit was perfect for making a banner.

I bought some burlap banners in bulk a while ago and used 6 pieces to make this banner.

I used my Silhouette Curio to diecut the letters to spell TARDIS from some royal blue cardstock and I grabbed out all the trims from my stash that might work with this.


Here is a video of my process of creating this banner.
Note: I was still working on the kit so I added the trim from the kit after finishing the video, check the photos below for the results.


I used Helmar's Premium Craft Glue for this project as it would give the hold needed for a item that will be hanging in my lounge room.


I used the Handles cut file and a scrap of silver mylar to create my Cyberman heads.  I then smudged a mix of gesso and grey ink onto them to make them look more beaten up like Handles was.
Check out how I used this awesome Mylar for a chrome look on my Happy Days Diner scrapping.


I love how it looks.


Such a fun bit of Timey Whimey stuff for our Doctor Who celebrations.
If you would love one of these awesome kits head to the Subscription Tab at Scrapping Fun Kits and fill in the form.


Saturday, 3 November 2018

White with 1 November Challenge - ET Awareness - Guest DT

When I saw the colour prompt for this month it was really special to me as I have been planning to do a fundraiser inspired by my Mum's journey with a rare blood cancer next year and had just started to select items for that kit.  The colour for Essential Thrombocythlamia is Orange so the kit will have some lovely orange bits.


This was a difficult layout for me to do mentally as I was working on it in October which is always a tough month for me as her anniversary and her birthday both fall in October but I think it was a important step in my journey of grief.

I wanted to make a TN sized layout to add into my October Daily as a tip in for the date of her anniversary, so I cut some watercolour paper to size as my base.

I pulled out my orange bits from the fundraising kit and from my October 2017 kit.  As well as my Distress Oxide in Carved Pumpkin and just started playing.


Here is a process video showing how it came together.  The next day I decided to change it a little so check out the below pic for the finished result.


In addition to the paper bag I added a label and flower from the October 2017 Kit cut apart and added a number 9 sticker to form a sort of date cluster for my October Daily.


I greatly appreciate all the support I had with my fundraiser in May.  Due to the support of my subscribers and fans I was able to make a good sized donation and with your continued support hope to do so again next year.  I will announce which charity it will be as soon as I have the donation approval letter from them, so make sure to check our social media regularly so you don't miss out on this announcement as Facebook doesn't always show you posts from pages you follow.

November 2018 Challenge List

Welcome to the November Challenge List.

I will try to update the Challenge List mid-month with any challenges that are not up yet.  So check back in a week or 2 to see what new challenges are up.

Due to positive feedback I will continue to split the list into Australian based challenges and International challenges, so make sure you scroll through and check out all the wonderful challenges as many allow entries from all over the world.
Please if I have put a challenge into the wrong catagory let me know, I worked hard to be correct but we can all make mistakes.

Please if there are any Challenges you are aware of that I have missed let me know.I am really loving participating in Challenges, it is getting me to craft more often, to do projects I may otherwise save to do later, and some there is the added challenge of completing them when I have limited supplies that meet the requirements but that just adds to the fun.
So now for the list, I will provide a link to each challenge that has a direct link for it and either their Facebook page, website, shop, whichever is appropriate so you have all the details you could possibly need.
Those that are in a Facebook Group I will link to the group, please contact admins of the group to let them know you are joining to participate in the challenges or look at the challenges as some admins have requested this due to the waiting list. 


White with 1 is a lovely grey this month and a fun sketch to help inspire you.  Here is their Facebook Page.


Scrapping Good Time - Scrapbooking Group Australia is a Closed Facebook Group that has multiple Scrapbooking Challenges and sometimes a Card Challenge each month.  This month they are having a special giveaway and to be in the draw you need to enter every one of their Challenges and participate in some other things throughout the month.

Made to Scrap - the Aussie way! have a fun moodboard this month.

Scrap the Girls has a beautiful and inspiring breast cancer moodboard this month.


Scrap the Boys has a cute prompt this month. Here is a link to their Facebook Page.  Make sure you check their blog for the rules of their Challenges.


Kraft+ Challenge has a fun prompt this month, make sure you head to their blog and read the requirements for this one. Here is the Facebook Group.


ARTastic has a lovely artwork on a plate this month.  Here is their Facebook Page.
And they are having a Design Team Call so make sure you check out the details and apply if you wish.


Scrapping Clearly has a lovely moodboard this month.


Dusty Attic has a lovely moodboard up on their Facebook Page and their Blog and for even further information, they also have a Website.


Sketchy Boards Challenge has a great Sketch and prompt this month and a fun prompt this month.  Follow the link for inspiration and rules.

D-lish Scraps Inspiration Board this month is a lovely summer feeling board, make sure you follow the link for inspiration and the rules of this Challenge.

Use Your Stuff is a great weekly challenge that is all about using the stuff you have.  


Archi-scraps has a interesting prompt this month.


Anna's Craft Cupboard has a lovely sketch challenge this month which you enter either via a Online Gallery or their Facebook Community.

Mystical Scrapbooks has a fun sketch this month.


SCRAPBOOKIT has a fun prompt this month.

International Challenges

CSI Challenge - Color, Stories, Inspiration is a fun challenge formatted as a case file for you to do.  I look forward to giving this challenge a go. 


Crafty Creations Challenge is a bimonthly craft challenge.  Make sure you read their rules as entry closing dates are different to most challenges.


Pixel Scrapper is a Digital Scrapbooking community that has a monthly challenge.  I am so glad I found this wonderful community. 


More Than Words has a great prompt this month.  Here are the Rules for their Challenges. Here is their Facebook Page.


Lasting Memories Scrapbooking Challenges have multiple challenges each month to inspire you.


Creative Inspiration is a online forum/group that features multiple challenges throughout the month.


Counterfeit Kit Challenge is a great concept where you take inspiration from a new kit that is out and create a kit from your supplies using that inspiration and so create layouts with your own kit.  They do a blog hop with their team showing each person's kit and layouts.  Well worth checking it out.


Scrappy Land is a bimonthly challenge that is all about getting out those dies and using them.  Make sure you list  the brand of die you used and that it is one their store stocks.


Craft-Dee Bowz is a monthly challenge that involves using a bow.  Head to their blog for more details. 

Stick it Down has 3 Challenges a month, a card sketch, a single page sketch and a double page sketch.  Head to their blog for further details. 

Rochelle Spears has a new Scrappy Friends Challenge.   She also has a bonus challenge this month

Scrap Our Stash has a fun prompt this month.


The ScrapRoom is a bimonthly challenge starting with their Freaky Fast Formula this month.


Project Life

Here is a list of Challenges that would suit creating Project Life layouts.  Note I do need to check the challenges that are new to the list and update this sublist.  I will update shortly.

Scrap the Boys have said they will accept PL layouts.
Scrap the Girls have said they will accept PL layouts.
Kraft+ Challenge accepts tradition layouts, art journalling, tags, etc so this challenge would suit PL I think.
ARTastic Challenge Blog accepts all forms of Scrapbooking as entries.

Scrapbooking Top 50 Australia accepts PL entries.
Show us your stuff accepts PL entries.
Scrapbook Boutique accepts scrapbooking, off the page, etc so I think it would suit PL.  The new challenge is posted on the 10th of each month.
Dusty Attic states in the August Moodboard Entry Rules (so assuming it is the same) that your project can be anything you desire including layouts, cards or off the page so it sounds like PL will be accepted.

Previous Lists


My scrappy friends who only scrap when at a crop, or who have stopped or reduced their time scrapping for any reason I think you will love some of these, have a look at each one.