Showing posts with label Crafters Choice. Show all posts

Friday, 27 December 2019

Santa Photo 2006 - Ruby Rock-It Creative Team


When organising my photos to send them to my daughter's house I found the very first Santa photo with my youngest, he is so tiny in this photo; I just had to keep it out and scrap it and Crafters Choice Festive Pop by Ruby Rock-It was the perfect range for scrapping this photo as it has those gorgeous summer colours and I can see by how sweaty the kids are it was a hot day.


Unfortunately I had kept the photo in the little cardboard folder the photographer put it in and it had damaged the corners.

If you have any photos stored in those folders I recommend getting them out asap.


I started by selecting some papers from the Crafters Choice Festive Pop 6x6 Paper Pad to go with my photo, I based my choices on the colours of my kids clothes as I wanted to draw attention to them.

I also pulled out some cardstock from my stash in colours similar to their clothes, starting with the pale blue of my baby boy's summer onesey.  Then pulling in a pink and a green.
The cardstock I chose works so well with the papers and between them it really helps show the layout is about the kids.


Next I started playing with the way my layers would sit on my page.


Once my layering decisions were made I selectively cut my papers so save some for later as I love these ones.  Adhering down with Helmar Acid Free Glue as I cut each layer.

Then I adhered my layers down without gluing all the way to the edge in case I wanted to tuck anything in.


One of the Santa die cuts from the Crafters Choice Festive Pop Die Cuts pack inspired me to build a scene as my embellishment cluster, the present paper in the 6x6 paper pad had appropriately sized presents for this so I fussy cut a few from it.


For the Tree I pulled out a Christmas Tree Charms Creations embellishment I got last year to help build the scene.

And when I saw this dog die cut I just add to add it as it looks just like the dog we had back then.  So it feels like Miffy is part of the story even though she couldn't be in the photo.
Given how hot and sweaty the kids look I thought this chipboard piece I had in my stash was perfect for this layout. 
I base coated it in White Gesso and then coloured it with Distress Inks in Spun Sugar on the heart, Brushed Cordoroy for the Kangaroo and a mix of Weathered Wood and Salty Ocean on the words.
I used a watercolour brush and applied multiple layers of the blue and pink, drying with my heat gun between coats so as to get a more effective look.

I adhered the chipboard down with Helmar Liquid Scrap Dots to give it the lift it needed. 


I added a small piece of Santa Surfing ribbon under the chipboard. 
Later I added 2 heart stickers from my stash to this cluster.


I added some paper strips to the top left and bottom right corners and added a doodley border.


I loved my page and should have stopped here but I just had to add some journaling.


Unfortunately my journaling just didn't sit right so I had to add more papers to cover it and I just couldn't get them to look right, so I added more and then added a bigger title with some old pink alphas I had.
I didn't notice things were crooked until everything was fully dried but I am embracing the wonkyness, it can represent how we were melting in the heat.  ;)


Monday, 25 November 2019

Santa - Childhood Christmas Memories Album - Ruby RockIt Creative Team


Those of you who were following me in 2017 may remember my Childhood Christmas Memories Altered Album and that I couldn't find the only photo of me taken with Santa so I had saved the front page for when I did find it.  I found it.  I am so excited.  Plus I found another Christmas photo of me that I thought had been lost/destroyed years ago, but that photo is for another post.
Those of you who weren't here for this project you can find out all about it by checking out my YouTube Playlist for it and/or my blog posts for the pages I created in 2017. 
Basically as I had no photos of Christmas as a child I Google Image searched the tree we had, decorations we had, places we visited and I obtained a Little Golden Book that I think I had as a kid and altered it into a mini album about my Childhood Christmas Memories.  It is one of my absolute all time favourite and most treasured projects.
When I found my Santa photo I felt Crafter's Choice Nostalgic Treasures was the perfect choice for scrapping it into my altered book.

As the photo is red and white I wanted to use a red paper as my background page, I loved the opulent cushion feel of this paper.
As the pages of my Little Golden Book are 6x8 I needed to use a paper from the 12x12 paper pad to ensure I could get a piece big enough.  I simply cut the 12x12 down to 6x8 and glued it in with Helmar Acid Free Glue.


After matting my photo on white cardstock and gluing it down to my page I decided it needed another layer so I cut a 1/2 strip of this paper that reminds me of a sparkly Christmas night from the 6x6 paper pad and trimmed the top and bottom off to get a shorter piece from the middle.  I glued it down so it look like it was under my photo matte.


When going through the die cuts pack this sleigh with white horses stood out as I had given Santa a white horse like this on this day.
I absolutely love it when a embellishment helps me tell the story of a photo so I knew this was the perfect die cut for my layout and I felt it was all I needed.
The story is the year before some of my teenage cousins wanted to take me to Santa for the first time and 2.5 year old me did not cope and I screamed and kicked the poor Santa.  So I really wanted to give him a gift to say sorry.  The Santa didn't want to take it so Mum had to explain out of earshot of me why it was important he take it.


I added some journalling in my usual black pen and then after adding my title, date and some snowflakes in white I decided to make it white.


I decided my page needed some snow so using one of the gorgeous snowflake stamps from the Crafters Choice Nostalgic Treasures Icons stamp set.
As I didn't have a white ink pad I just coloured the stamp with my white gel pen and hoped for the best, I actually really like how it turned out, it feels more snow like to me.
I then added my title with some ancient alphas from my stash and the year the photo was taken in the top corner.  I may be off by a year but I think I am correct.

I will do a new flip through video of my completed project at the end of December so you can see how it has all come together to be a gorgeous memento of my childhood Christmas.


Monday, 11 November 2019

Preparing for December Daily in my Journal - Ruby Rock-It Creative Team


This is the time of year when I am starting my preparations for December, in my last Ruby Rock-It Creative Team post I shared with you my setting up a Pocket sized TN as my wallet with a Christmas feel using Crafter's Choice Nostalgic Traditions and Today I wanted to share with you the other important part of my December that needs preparing.  My December Daily Journal, like my October Daily I combine December Daily with my journal keeping as I have found it is the only way I can get it completed.
With doing December Daily each year I struggle with needing Summer feeling Christmas supplies that suit it as apart from maybe 3 or 4 traditional coloured spreads my layouts tend to be needed Summer feeling supplies as it is so hot here at that time of year, so when I saw Crafters Choice Festive Pop I felt it was perfect for my DD Journal this year.  I am combining it with some items from Nostalgic Traditions but I think I will mostly use Festive Pop as it is so fun and perfect for hot weather Christmas memory keeping.
I selected the Festive Pop 6x6 paper pad, Sticker Booklet and Die Cuts for setting up my DD Journal, they coordinate so well with the gold striped notebook I am going to use for my journal.

I knew I wanted a pocket inside the front cover to hold the various numbered items, memorabilia I collect, etc while awaiting my weekly sit down and stick in my memories session so I selected a paper from the Festive Pop 6x6 paper pad to form my pocket.
At the end of December when I am finished with the supplies I keep in the pocket I will use it to hold mementos that don't fit on any of my layouts, thereby keeping my memories from December together and easy to find.

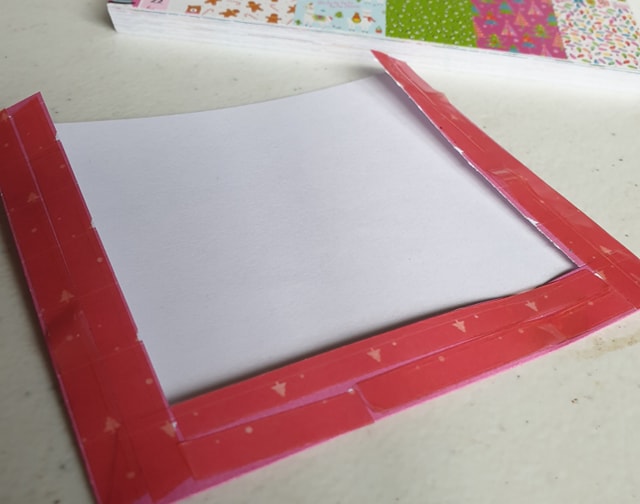
I measured the inside of my cover and added a inch to the  measurement and a half inch to the  measurement.  I cut my paper to this size and then scored a half inch on 2 sides and the bottom.
I snipped out the corners and folded my scored sections over, burnishing for a crisp fold.
I added Stickmast Heat Resistant tape to my folded edges. 
Note I use heat resistant tape when I can't use liquid glue as the climate in my home all other adhesive other than my preferred Helmar Glue and the Heat Resistant Tape gives way during Summer.

I adhered my pocket down to the inside of my cover, being careful to line it up with the edges.
How perfect is this paper for the inside of this cover?


Next I went through the paper pad and pulled out one of each of the papers that had numbers on them.

I partially cut them up to put in my pocket, ready for on the go memory keeping.

Aren't they just perfect for a Summer DD?


Now I could move onto my front cover.

I went through the Festive Pop Sticker Booklet and decided to spell out December 2019 using 2 of the alphas in the booklet.

I added 2 stars from the Festive Pop Die Cuts to the top corner, gluing them down with some Helmar Acid Free Glue.


Next I built a cluster down the bottom with trees and presents from the Festive Pop Die Cuts and Festive Pop Sticker Booklet.

I needed a tiny present under the green tree and next to the pink and silver tree so I cut the present this cute dog was carrying from the sticker and layered the badly cut edge under the tree, I then neatened up the dog and added him to my cluster as he is so cute.


Finally I decided the inside of my cover needed a bit more so I selected this awesome spotty paper from the Festive Pop 6x6 paper pad and cut it just a shade narrower than my pocket.  I adhered it with Helmar Acid Free Glue, tucking it into the pocket.

I held the pocket slightly open for a few minutes to ensure it wouldn't stick closed.  I accidentally tore the top of my pocket so I selected this blue sticker strip from the Festive Pop Sticker Booklet and stuck it down along the top.  To pull the blue further into the layout I added a blue tree sticker to my pocket.

As my star on the front was poking up I added 2 stars from the Festive Pop Die Cuts to the inside of my cover, lining them up with the bits that were poking up.

While I had the  out I cut out the number stickers from it and added them to my selection in my pocket.  Now I have plenty of choice when I am documenting my December memories.


I really love how Summery my journal feels.


Monday, 21 October 2019

Christmas Pocket TN set up - Ruby Rock-It Creative Team


When I saw the new Crafter's Nostalgic Treasures range I loved it's traditional colours and thought it would be perfect for my planner set up for the lead up to Christmas, journaling the events of November and December that involve traditional colours and scrapping memories that need those gorgeous traditional colours.


I have been having a bit of a creative block and my usual tactic of just sticking something down and keep sticking until I am happy with what I have hasn't worked so I used my other creative block ending tactic of picking a simple project that needs doing and just doing it.
I have wanted to try using a Field Notes sized TN as my wallet for ages and scored a cover cheaply the other week which came with a insert that had no cover on it so I decided to break my creative block by making a removable cover for my insert and see where that takes me.

I decided I wanted to use the foiled papers in the 12x12 paper pad from the Nostalgic Treasures range for my pocket TN and if this went well I would make a few items for it to give myself a cute Christmas planner to carry with me.
I loved the first paper in the pad so cut a piece measuring 5 5/8 by 7 1/2 inches.
I wrapped it around my insert, creased and then trimmed any overhang.

I then cut a piece of the gorgeous mirror gold cardstock from the Crafter's Choice Luxury A4 Gold Cardstock pack the same size, scored it and then adhered it with Helmar Acid Free Glue to the inside of my paper.  This would give the cover some needed structure and it looks gorgeous.  


Best of all my TN cover has gold elastic and gold on the inside so it coordinated beautifully with my TN cover.


I used some Distress Ink in Fired Brick around the edge of my paper.


I had a slight misalignment so I used a old border punch from my stash with the Gold cardstock I lined the inside of my cover with and punched a border for my front cover, adhering it down with glue.

I then grabbed out my pack of Crafters Choice Nostalgic Treasures Die Cuts and selected the car and a Merry Christmas die cut to use on my front cover, adhering them down with glue.


I added the word Plans under the word Christmas with some alphas from my stash to finish off the look.

I now have a adorable notebook for writing down notes about my plans for this Christmas, gift ideas, names of recipes to try, etc.


While I had the Crafters Choice Nostalgic Treasures Die Cuts out I decided to make some cute paperclips for my Christmas planning.
I sorted through the die cuts and found ones that would match back to back.


I added a glob of Helmar 450 Quick Dry Adhesive and placed my paper clip in it before adding my other die cut to the top.
I left them to dry for a while to ensure a strong hold.


I decided my cover needed something so I grabbed out my Crafters Choice Nostalgic Treasures Tag Pack and selected a tag to tie to my elastic on the front of my cover so it would look more festive.


My final need in this TN is a reward cards insert, I followed this tutorial I found on YouTube..
I selected a foiled paper to use and got to work creating it.  I now have all my reward program cards in a easy to access folder.  Organised by frequent of usage and location where I use them, as living regionally some cards are only used when I shop in other towns. 


I love how cute and festive this set up is and now feel more confident about getting my A5 planner set up for the more detailed planning at home.