Showing posts with label Nerd. Show all posts

Friday, 27 September 2019

DIY Dice Tray - Helmar Creative Team

Today I have a quick DIY gift idea for the Board Game lover in your life, or you could just make it for yourself.   A cool Dice Tray, the boys made these Dice Trays for their Dad for Father's Day and I thought I would share how they created them so those of you needing gift ideas for the Board Game loving people in your life can get started creating gifts for Christmas if you wish.

The purpose of a Dice Tray is to not lose you dice under the couch and to reduce problematic rolls like the dice being cocked, etc.  Keeping this in mind I kept my eye out for some nice deep frames that weren't too big so they didn't occupy too much table space.  I would have loved to upcycle a old frame but after 15 months of scouring op-shops I had no luck so bought the frames from The Reject Shop and I am trying to come up with something to use the glass for or find a artist who will use it and give it to them.
So here is what you need.
Helmar Fabric Glue
Helmar 450 Quick Dry Adhesive
Felt in your preferred colour
2mm and/or 3mm Craft Foam
Deep Photo Frames
Scissors
Pen or Pencil.


Remove the back piece from the frame, this is the part you will be working with. 
You won't need the glass or hanging hardware so save them for something else if you wish.
Place the back piece down on your foam and trace around it.  
Cut on the line. 
Do the same with your felt.

Run some Helmar 450 Quick Dry Adhesive around the outer edge of your back piece and a squiggle in the middle and adhere your foam down.


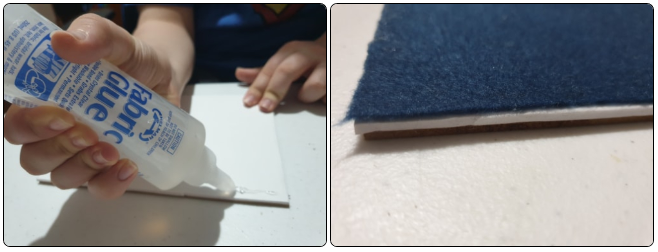
Once your Helmar 450 Quick Dry Adhesive is dry run some Helmar Fabric Glue around the edge of your foam and adhere down your felt.
Put your frame back together without the glass or hanging hardware and you are ready to role.
E made a mini Dice Tray with Green felt so our awesome DM has something a bit more compact when needed.    He had to test it out with his favourite D20 and he was pretty happy with his role.

Why not make a Dice Tray as a gift for the board game loving person in your life?  They will love it.


Wednesday, 17 July 2019

Friends - CraftOnline Creative Team

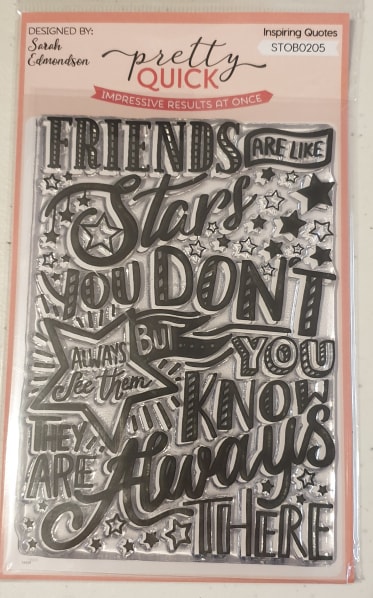
I love Typography but due to my hand issues I can't do it myself so I was scrolling through CraftOnline's shop looking at the various Typorgraphy type stamps and fell in love with the range from Pretty Quick, the "Friends are like Stars" stamp had me thinking about how it is so true of my friendships, we go for long periods of not seeing each other or chatting but when we are there and when we do get the chance to see each other it is like no time as passed.
This lead to me thinking about my friend Shirlee who makes gorgeous cakes for my family and how this stamp makes me think of her so I decided I would scrap the photo of the cake she made for C's 14th and keeping where his party was held in mind I started exploring the store for anything that would suit a computer game themed layout.


https://www.youtube.com/watch?v=UUp6dHiYtxU&feature=youtu.be

Here is my process video for this layout.    You can click on the above pic to have the video open up in YouTube or click on the below video to watch.


Close up pics of the various aspects of the layout are further down in this post.


Items used on my project.
Poppy Crafts 6x6 Textured Cardstock pad
Pretty Quick Inspiration Friends Are Like Stars stamp
To get a nice clear image from the quote stamp you will need a precision stamp tool such as the Misti or the Stampmaster Precision Stamping Tool I used.
Dina Wakely paint in Evergreen
Helmar Liquid Scrap Dots
Poppy Crafts Wooden Elements Birthday 
Helmar Acid Free Glue
Helmar 450 Quick Dry Glue
The Stamping Bella stamp I used is now sold out but I think Oddball Geek would be also suitable (still available at the time of writing this.)
Eyelet Outlet Video Game brads
Dina Wakely Washi Tape #4
49 and Market Captured Adventure 6x6 paper pad
The PhotoPlay paper I used is now out of stock as is the individual sticker sheet from Birthday Boy Wishes, however the collection for Birthday Boy Wishes is still available and has a great green paper that would work well with this layout, I didn't order it as I had Jurassic.
I stamped my images with Archival Ink in Black and Grey on watercolour paper.
I coloured my Gamer image with the following Distress Inks: Victorian Velvet, Antique Linen, Brushed Corduroy, Gathered Twigs, Black Soot, Hickory Ash, Blueprint Sketch and Chipped Sapphire.
I used the packaging technique on my cardstock and my stamped quote with Distress Ink in Twisted Citron and Mowed Lawn.
And I sealed all my items I had used Distress Ink on with Helmar Crystal Kote Fixative.


After I had all my bits I decided to add the new Poppy Crafts Paper Storage Case to keep my supplies in when working on a specific project.  And I grabbed a new pokey tool so I grabbed the Poppy Crafts Embossing Tool as one end is a pokey tool and the other is a little spatula and a T-square as I really needed these.


This quote was perfect for this layout, not just for describing our friendship with Shirlee but for describing my son's friendships as some of his friends he doesn't get to see often but when they get together it is like no time has passed.

The balloons from the Birthday Boy Wishes range were perfect to pop behind my Oddball Gamer and cute wood veneer party hat from the Poppy Crafts Wooden Elements Birthday that I painted green really helped tell the story of the layout.

And how cute are those game controller brads?


I am really happy with how my Oddball Gamer turned out, Distress Inks are a great way to add colour to stamps.

The Helmar Liquid Scrap Dots gave him the lift he needed to pop.


The grungy papers from the 49 and Market Captured Adventure 6x6 paper pad combined with the green paper and the cute balloon number stickers really helped tell the story .   Adding some doodly balloon string and doodly boarders helped things feel finished.


Creating a little quote card with the little quote that comes with the Oddball Gamer and combining it with the celebrate die cut from the Happy Hooray range that I used on my son's Fortnite layout and one of those cute game controller brads also aided in the telling of the story I think.
I think that Dina Wakely Washi was perfect for this layout.


I am really happy with how this layout turned out.  The Birthday Gamer Kit I pulled together was the perfect way to document this event and that gorgeous quote stamp really helped add that aspect of story telling regarding friendship to the layout.

I hope this has inspired you to create something.  If it has and you wind up creating a project due to this please let me know, I would love to check out your project.

Wednesday, 15 May 2019

Easter Stargazers - Helmar Creative Team

On Easter Weekend 2016 we decided to watch something we had missed when it was live (I love that catch up TV means we can watch things when it suits us) so Easter Saturday we brought up the Stargazing Live event with Professor Brian Cox and so began a day filled with pausing iview so hubby and the boys could discuss some Astrophysics.  It was a interesting day, especially seeing E start to expand in his enthusiasm and knowledge for this topic and was just another step in my journey as a person with multiple Astrophysics enthusiasts in my life.


I really wanted to tell this story in my album, as I don't have photos of us on the day I thought a good way to do this would be to scrap a photo of the Hubble Space Telescope  and a photo from the Hubble Space Telescope that my husband and boys love, the Ultra Deep Field 2014.
The photos from the Hubble Space Telescope are public domain which is just so awesome as it means my boys and hubby can surround themselves in their favourite photos, for example Hubby's work diary has dividers made from some of his favourite photos.


To create my layout I grabbed out a selection of Space themed scrapping supplies in my stash and started playing.

I decided I wanted to matt my photo on some of this shimmery navy paper I have in my stash and that I should have a border of it around my layout too.  I thought the border would be perfect for my journaling but I wanted to be sure it would fit before I started so I grabbed my gold gel pen and wrote my journaling around the edge of my 12 x 12 shimmery navy paper.  I cut out the middle by leaving 1 inch all the way around.


I selected a background paper from the Carta Bella Space Academy pack that I bought from Aunty Vera Scrap and Craft last year, I went with Racing Rockets as I love the Solar System map on the back.
I needed to trim it so it wouldn't cover my journalling and I started by first trimming 3/4 inch off the bottom and 3/4 inch split between the 2 sides to get a 11 1/4 inch piece.  I then checked it wouldn't cover my journalling and trimmed another sliver off the bottom and side.

After some playing I decided to make the Hubble Space Telescope itself the main feature photo of this layout.  I matted it on some of the shimmery navy paper and then I started layering.  I had a small scrap of this gorgeous paper from my Crafter's Choice Galaxy paper pad so I wanted to save what was going to be behind my photo and I cut a little window out.


I added a scrap of the star paper from my Scrapping Fun Kits April 2018 kit and another layer of the shimmery navy paper and then I decided to use my husband's favourite Hubble Space Telescope photo as layer so I trimmed out what would be behind my layers, applied some Helmar Acid Free Glue to the inner edge so I could play with my layer cluster to get it just right.
I then applied Helmar Acid Free Glue around the outside of the back of my cluster and through the middle to ensure I would get all my layers adhered down.


For my title I decided on Easter Stargazers.  I decided to use some very useful Ruby Rock-It chipboard alphas and paint them gold to pull it all together with the journalling.

I adhered my chipboard alphas down with Helmar 450 Quick Dry Adhesive.


For the Stargazers part of my title I used a sticker from the sticker sheet from Carta Bella's Space Academy pack. 
I needed to adapt the Stargazer sticker to say Stargazers so I stuck a S from some old Basic Grey alphas so some white cardstock and trimmed it.  I then stuck this and the sticker down to a scrap of that shimmery navy blue paper and roughly cut around it.
As my Easter was thick chipboard I felt Helmar Liquid Scrap Dots was my best option for adhering down Stargazers as it would mean I cn adjust the height easily to suit my chipboard alphas.  I applied several dots along my word and at the S and g I added a extra on to ensure the full length of the letter would be supported.
I love how it sits up perfectly with my chipboard alphas.


My photo cluster covered over a planet on one of the outer circles so I decided to add this cool wood veneer planet I got from Corbett Creations last year to my layout as well as the cute stars that came in a pack with it.

Now that I was happy with everything I needed to adhere it to my journalled boarder but my Helmar Liquid Scrap Dots were still drying so I ran some Helmar Acid Free Glue around the inside of the journalled paper and then put down my main paper.


Using Helmar Glue gave me the wiggle room I needed to get this perfect without having to possibly rip my page if I didn't get it perfect first time.  And best of all I know my project will last a lifetime.