Showing posts with label Design Team. Show all posts

Monday, 7 October 2019

I Love Dance - Ruby Rock-It Creative Team

When I saw the gorgeous new Bella Mini Theme called Dance Queen I just had to scrap photos of my Granddaughter's first dance lesson so I decided to make a a TN kit from DQN69 Fusion and DQN83 On Pointe adding some lace from my stash. 
I decided to keep DQN76 Pose as a full sheet so I can use it with the left overs from this project to do a 12x12 layout for Miss E's album later.

I selectively cut words and cards from DQN69 Fusion to start my little travel kit and then I cut DQN83 On Pointe down to 2 pieces measuring 4 1/4 x 8 1/4 as I thought I might want to do a double page in my TN with the adorable photos I have.
I also added the 8 1/4 long scrap from doing this and a piece of Fusion that I didn't want the cards from to use the back side of both of these as layers as they are just gorgeous.


Now that I had everything ready to go I worked out photo placement on my 2 pages and trimmed the photos as needed.


On what would be the left page I decided to carefully adhere the photo to my matte piece and then create a pocket with them using Xpress It Double Sided Tape, so I could tuck the adorable tags from   behind them to give more layers but I would also be able to get my daughter to journal about this memory or I could journal about our Facetime chat about it at a later date.


I then added my piece of lace and selected one of the words that I had trimmed from  and adhered them down with Helmar 450 Quick Dry Adhesive.


Now to move onto the right hand page.
I worked out my layers and I knew I wanted to add a ballerina to this side so I fussy cut her out and tried to save as much as the card as I could so I could tuck it in to the layers on both pages to give more texture.

On the left page I tucked a section from the card under the lace.


I tucked a piece of the card behind the Ballerina I fussy cut from the card and slightly under the photo.

When adhering the Ballerina I just put some glue down the middle of her so she would still have some dimension.

She really is perfect for these photos of my Granddaughter, isn't she?


Finally I adhered my 2 pages into my Traveler's Notebook.
I love how the double page spread turned out.


Wednesday, 14 November 2018

Dr Who Celebrations - Weeping Angel Doll Decoration - Helmar Creative Team

I decided earlier this year to create more fun in our lives.  At first I thought about doing themed days for their educational, cultural and awareness raising value, I also realised making the decorations and food could be great for fine motor skill and sensory activities for myself and the boys.
With this in mind I have been trying to think of themed things we could do and Dr Who is just perfect for this need, and we could get 3 days out of it.  Dr Who Day could be the season premiere, the anniversary aka my Granddaughter's birthday and Boxing Day (our favourite Dr Who Day each year).  So I picked out a few ideas that would be things myself or the boys could do and one thing I have wanted for a long time is a Weeping Angel decoration so I decided to make a Weeping Angel decoration that could either stand on the table or be a tree topper.
I found a few tutorials online for converting a barbie into a Weeping Angel and I asked my friend that lives in the town that has my closest Kmart to pick up one of their $4 barbies for me when he was next in Kmart, as I couldn't get to the op-shop at the time.  About a hour later he sent me pics so I could choose one.
All the tutorials either melted the elbows and wrists or used hot glue, I didn't want to melt plastic as this releases toxic chemicals into the environment and I prefer using Helmar glues over hot glue as I tend to get glue all over me when I craft and Helmar doesn't burn.  So I planned out what glues I would try for which part and set to work once my friend dropped off my $4 knock off barbie.

Items needs
Cheap barbie type doll
Craft Foam
Gauze
Thin ribbon scraps
Pewter Spray Paint
Sheet of cardstock
Helmar Fabric Glue
Helmar 450 Quick Dry Adhesive
Helmar Foam Glue
Stanley Knife
Cutting mat
Scissors
Embossing stylus
Marker for drawing your wing outline.

I decided to try using the doll's hair to create the Angel's hair instead of the method used in all the tutorials and absolutely love the finished look, it was certainly much easier than the other method.
I simply put her hair into a ponytail at the right spot on her head (her original style was too high), then I wound the hair around into a bun shape and gluing with fabric glue as I went.  I finished it off by trimming the hair and using fabric glue to kind of seal the shape where it was trimmed.  I thought that once it was painted you wouldn't be able to tell.
I finished it off by adding a skinny ribbon around her head with Helmar Fabric Glue.


Now for the arms I simply cut them at the elbow with a stanley knife and glued them at a right angle using Quick Dry 450, as the edges don't meet very well I let it have a long drying time and then used some polymer clay to fill in gaps and sort of stabilise the joint.
I didn't need to do anything to the wrists as the plastic is a soft plastic so her wrists and fingers were bendy and a small amount of glue where the fingers need to attach was all that was needed.


For the dress I started by making a cardstock cone, I simply wrapped some cardstock around at her waist into a cone shape, glued it at the seam with Helmar 450 Quick Dry Adhesive as that is what was on my desk and open.  And then trimmed the base of the cardstock level with her feet.
I then cut some white tulle and cut head and arm slits in it.  Put this over her and tied some ribbon around her waist.  I added in sections of tulle to cover her cardstock base.
I eventually realised that because I had bought Pewter Paint not Stone or Granite the tulle would show as tulle so after putting her wings on I added some gauze by selectively gluing pieces over her and then tieing another skinny ribbon around her waist.

For the wings I used some 1mm white craft foam.  I cut a rough angel win shape and drew in the feathers on both sides with a embossing stylus. 
I also cut 2 small bits for the tops of the wings.  I glued these onto the base with Helmar Foam Glue, and let dry.
I attached the wings to the doll with Helmar 450 Quick Dry Adhesive.


I took her outside and spray painted her with the Pewter Paint, taking her upstairs to dry on the railing of my back landing.


I love how she turned out and because I used Helmar I know she will last.

Check out how cool she looked on my Dr Who themed table.


Tuesday, 6 November 2018

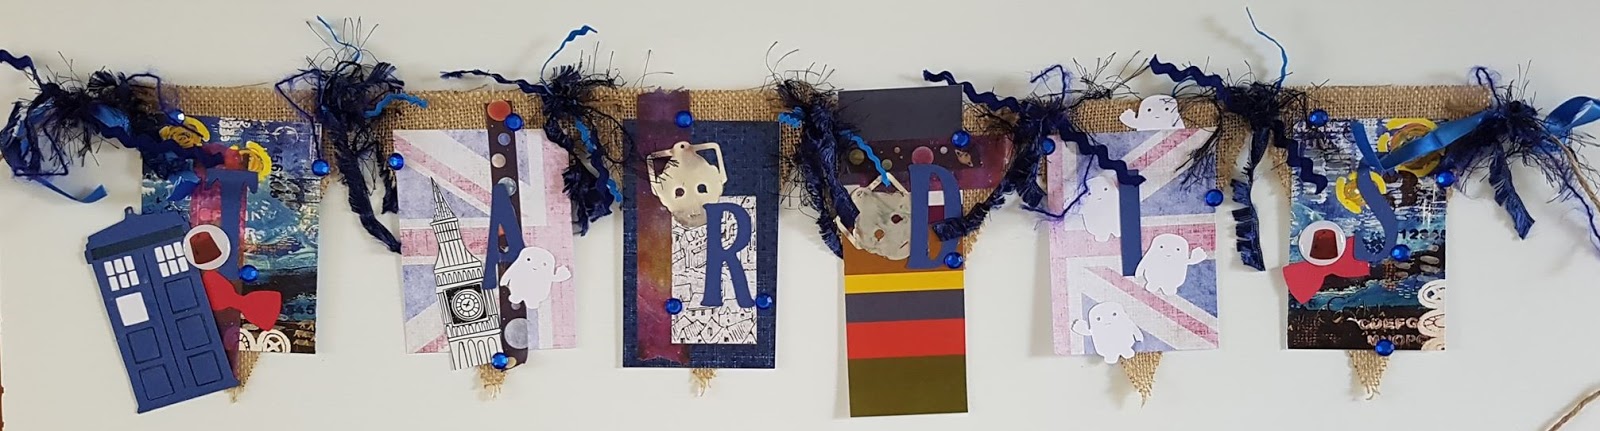
Dr Who celebrations - TARDIS Banner - Scrapping Fun Kits DT

I am loving doing themed days with the kids, it is a great way to get E doing fine motor skill and sensory stuff.  I am making a couple of decorations myself and Today's post is one of those projects.

I really wanted a banner to hang for the significant Who days, aka season premiere, anniversary/my granddaughter's Birthday and the Christmas special/Boxing Day and this kit was perfect for making a banner.

I bought some burlap banners in bulk a while ago and used 6 pieces to make this banner.

I used my Silhouette Curio to diecut the letters to spell TARDIS from some royal blue cardstock and I grabbed out all the trims from my stash that might work with this.


Here is a video of my process of creating this banner.
Note: I was still working on the kit so I added the trim from the kit after finishing the video, check the photos below for the results.


I used Helmar's Premium Craft Glue for this project as it would give the hold needed for a item that will be hanging in my lounge room.


I used the Handles cut file and a scrap of silver mylar to create my Cyberman heads.  I then smudged a mix of gesso and grey ink onto them to make them look more beaten up like Handles was.
Check out how I used this awesome Mylar for a chrome look on my Happy Days Diner scrapping.


I love how it looks.


Such a fun bit of Timey Whimey stuff for our Doctor Who celebrations.
If you would love one of these awesome kits head to the Subscription Tab at Scrapping Fun Kits and fill in the form.


Wednesday, 17 October 2018

Halloween Upcycled Mini Album - CraftOnline Creative Team

While I was experimenting with my Distress Oxides the The Stickmaster Heat Resistant Tape was there on the back of my desk and I was inspired to put what I was doing away and instead create a mini album like the one I made for Earth Day this year.  Since it is heat resistant I wanted to see if it would survive a summer in my home and I thought I should make the same style I made for the Earth Day album so I can make a true comparison, I will also make a Christmas themed one with the tape I used to use to make a fair comparison.
I am excited to see the results of my test next March.

Items used
Fancy Pants Designs 6x6 Spellbound
The Stickmaster Heat Resistant Tape
Tim Holtz Distress Oxide Carved Pumpkin
Tim Holtz Idea-Ology Trimmings Halloween 6 pack
Tim Holtz Idea-Ology Trimmings 2 pack black and orange
Jolee's Boutique Dimensional Stickers Moveable Skeletons
Jolee's Boutique Gauze Ghosts (no longer available)
Silhouette Curio
Helmar Acid Free Glue

The Halloween supplies I ordered to make a card for my friend made decorating this mini so easy, the 6x6 pad was perfect for a quick crop and glue down.
I also die cut a few Halloween items with my Silhouette Curio that I bought from CraftOnline last year.  Having a pile of die cuts that suited my theme ready to go really helped the creative process.

Here is the unboxing of the supplies.


Here is a process video of how I made this album.


I love how this mini album turned out and can't wait to give it to me friend.


Why not give making a upcycled mini album a go, they turn out so cute.
I will have another post later in the month with my decorating of the cover of my October Daily and experimenting with that gorgeous haunted house stamp, so if you haven't subscribed to my blog and YouTube Channel yet make sure you do so you don't miss out on seeing that post.  :)

Wednesday, 12 September 2018

Happy Days Diner memories - Craftonline DT

Welcome to my first post for Craftonline's new team.  I am so excited to be on this team, my creativity is flowing and my brain is full of ideas.
My first idea was to record my memories of taking family to Happy Days Diner so I selected supplies that would coordinate with the colours and theme of the restaurant.


Here is a list of all I ordered that is still available.

Sound of Music Die Cut Border by Find It Trading Amy Design
Vintage Vehicles Punch Out Sheet by Find It Trading Amy Design
Bazzill Mylar Silver Cardstock
Deep Red Stamps Vintage 45 Record Stamp
NY Cake Silicone Mold - Dress
Prima Marketing Havana Mulberry Paper Flowers and Leaves
Crate Paper Maggie Holmes Willow Lane Alphabet Stickers
Crate Paper Wild At Heart Thickers Charming
Crate Paper Maggie Holmes Willow Lane 6x8 Paper Pad
Simple Stories Good Vibes Stickers
Dovecraft Accordion Sticker Flowers
Pink Paislee Colour Wash Title Stickers
Pink Paislee Nantucket Crabcakes paper
We R Memory Keepers Hello Darling Radiant paper
Vicki Boutin Mixed Media Paints Set 1
Versacolor Pigment Ink Cyan
Versacolor Pigment Ink Lilac

I decided to prep my embellishments first, starting with a cute 50's dress embellishment.  I was inspired by Farrel's Helmar blog post on making your own embellishments with Helmar Glue and a silicone mold, so I wondered if Craftonline had any silicone molds that would suit a 50's theme and I found this fantastic dress mold.
Due to my mold being much bigger than Farrel's mine would not dry properly, so I decided to try making my own paper clay with archival safe paper scraps and Helmar Acid Free Glue. 
I started by tearing up some archival paper scraps and soaking them overnight in water.  The next day I used my blender to turn it into paper pulp.  E had fun squeezing the water out of the pulp, I got him to do it as it is a great activity for Fine Motor Skills and Sensory Processing.
Once the water was squeezed out of my paper pulp I added Helmar Acid Free Glue until I had a clay consistency, then I dusted my silicone mold with corn flour and filled it with my clay and let it set over night, hitting it with my heat gun a couple of times to help it dry to be sure it dried well.
I had fun painting my dress with Vicki Boutin paints in Cotton Candy and Banana.
I decided to make a second dress but I didn't filly the middle to the top, I wanted to try doing a hollow dress.  It turned out really well, I mixed some cyan Versacraft ink with white paint to paint majority of the dress.  Then mixed some lilac Versacraft with white pain to do part of the bottom of the dress and a base on the flower and bow.  I finished the flower, bow and the very bottom of the dress with cotton candy Vicki Boutin pain mixed with white paint.  I then painted the bottom edge with white paint.  I absolutely love how this dress turned out.


When I was waiting for my glue attempt of the dress to dry I die cut this awesome die and this amazing Silver Mylar cardstock from Bazzill and I stamped my records and coloured the labels using some distress inks as watercolours.


Now that all my embellishments were ready to go I started scrapbooking.  I got 5 layouts done with all my wonderful supplies and I have lots left for more layouts.


Monday, 3 September 2018

Cheshire Cat Ears

I am so excited to share this project with you, it is a bit different to my usual projects but a lot of fun. . 
When I saw that FraserPop 2.0 was having a Mad Hatter's Tea Party I was inspired to do something I have always wanted to do, create a Alice In Wonderland inspired costume, as I am a novice I decided to see if I could get a dress that would suit converting into a costume so the colour I found was perfect for a Cheshire Cat costume so I started planning out what I needed to do and knew I needed to make some ears.

I watched and read a few tutorials so the way I created them was what stuck in my head from the tutorials.
I used the template that is in the description of this tutorial by Ember Tay to cut my pink felt and purple fur fabric, when cutting the fur I did not use scissors as I didn't want to cut the fur just the backing of the fur.  So make sure the fur fabric has the right side facing down and go gently with a craft knife so you just cut the backing and not the fur, you get a nicer result with the fur this way.  I can't remember where I got this advice from but it was great advice, so thank you to those who share tips :)

I used Helmar Fabric Glue to adhere the felt to the fur fabric.  I lined the middle point of the felt up with the middle point of the fur and stuck it down.


Then I ran a line of Helmar Fabric Glue down the side of the felt and folded the fur over on each side.


Next trim off the overhang of the fabric.


Then I ran a line of Helmar Fabric Glue on one half of the bottom of the ear and glued the 2 side together.


They are already looking like ears, now it is time to add clips.


Once the ears were dry I grabbed my hair clips and opened them so I wouldn't glue them closed.  I used some Helmar Quick Dry 450 Glue on the top part of the clip and adhered it to my ear with the narrow end of the clip (open end) going to the back of the ear as this is where it is narrowest.  The clip helps the ear shape complete itself.


They turned out so cute and being made with Helmar glues I know they will last.


So when you are in need of making something for a costume why not try some Helmar glues, they get fantastic results that hold up to cosplay really well.


Cosplay Sewing Cabinet

When E asked to make his own cosplays that included sewing I said we would learn to sew together.  However due to limited space and not being able to lift the machine from storage whenever it is needed I decided to get a second hand Horn Sewing Cabinet and that we would keep all Cosplay making items that fit in it in there, it would be our Cosplay Cupboard.

I found one for sale locally for a good price and arranged a friend to help pick it up.  It looked to be in great condition.  However, when we got it home and I was starting to put stuff in the compartments in the door, the sunlight coming in the big window in my craft/therapy/home school room showed up yellow mold on the doors.  So I spent some time cleaning the mold off, once I had removed the mold I set up the cabinet and thought that was it.

A few days later the laminate on the lids lifted off at the edges, in places and I noticed invisible tape was used to hold it in place   So I started thinking about how to fix them but hadn't really come up with a idea. A few weeks later as it got worse I thought I might need to see if I could get the laminate off and paint it and I was trying to think of a way to make it inspire creativity when I thought "Wouldn't it be great if it represented as much of the nerdy things we love as possible?  I wonder if I can find some damaged comics and cover it in comics for the various things we love."  I have never decoupaged before, unless you count the Grungy Fusion Marker Holder I did in June, however that was very different, it used thick scrapbooking paper which I was able to just glue down, this would need Helmar Decoupage & Craft Paste and using decoupage techniques so I was feeling a little daunted by my idea and messaged Helmar to ask what they thought of my idea, they were very supportive and encouraging, I don't think I would have wound up going through this idea without their encouragement and support.  Another reason why I love Helmar not just because the glues are brilliant but because they are so encouraging of creativity and crafting.

So now that you know how I came to the decision to do such a ambitious project lets get to how I did it.

I watched a lot of decoupage videos including decoupaging with comic books before starting.  I wanted to be sure I knew what I was doing and spent a lot of time trying to find damaged comics as I didn't want to damage a comic that might be valuable to someone.
I had no luck at op-shops looking for damaged comics so I went to my nearest Comic Book Shop and explained what I wanted to do and that I needed comics that wouldn't have value in the future.  He was very helpful and pointed me in the direction to his $2 box which has reprints in it so they will never be of value as they aren't originals and it had comics that were damaged in.
I spent some time on the couch going through my collection and cutting out full pages I loved and sections I loved, I had 3 Wolverine reprints amongst my collection but I found myself unable to cut the story apart so I only took bits from the cover, I know they will never be worth anything but I have loved Wolverine since I was 14 and I just couldn't cut the story up.  I remembered I had some old damaged K-Zone magazines that E bought himself a couple of years ago at the op-shop in a box for a future craft project and grabbed them out and was so happy to see they had some Star Wars, Harry Potter and Spiderman bits in them I could use.  One of the DC comics had a add for Dr Who in it so that meant I could include something Dr Who on my cabinet.

We put some baking paper down on the dining table so I could work at a more suitable height for my back, I started my project with the lids as the needed to fixed more than the doors (I thought), so if I ran out of comics at least it would be done and protected.
I mixed some of my Acrylic paints to get a comic book charcoal black to paint the lids as a base coat under the comics.

Once the paint was dry I laid out some of my comic pieces to make sure I was happy with how it looked before gluing down. Due to lack of space I did both lids first and planned out my comics with the lids side by side to ensure they flowed but the doors I did individually.
When decoupaging, I worked in small sections, applying the Helmar Decoupage & Craft Paste then putting the comic piece down and smoothing it out, I tried smoothing it out with my sponge brush and with a old credit card, however some of the comics wound up with wrinkles, but I didn't mind the effect as it added to the loved feel of the comic pieces. 

I was having issues with the foam in the brushes I was using breaking down rapidly and leaving particles in my finished project.  I changed to the Universal Crafts foam brushes from Craftonline, I only used one brush for the front doors, washed it to then paint the sides and the foam is still in great condition, whereas the other brand I went through 4 brushes on the lids.

It seems to be the paper type they used.  All up I had 4 brands of comics and 2 of them just wouldn't smooth out properly, a third wasn't too bad but still not great.   They would be smooth and perfect when they went down but as they were drying they were wrinkling up.  It was odd.  Someone suggested it may even be the ink used but I think it is the paper as some pieces from Kzone were great and some wrinkled and that has different papers throughout it.

What I noticed about the pieces that took to being decoupaged really well got me thinking that for the doors I would try spraying my pieces with Helmar Krystal Kote Fixative Spray to protect them from wrinkling.  Craft is a experiment and about learning after all.

So I took my pieces for the doors outside and a box to spray into in case of wind and set about coating them all with Helmar Krystal Kote Fixative before Lucas was due over to help me with the doors.


After doing the smaller door I found I was having less issues with the paper wrinkling as it dried so for the big door I decided to give the pieces another good coat of  Helmar Krystal Kote Fixative Spray  This really did help, the big door has the best finish.

After decoupaging each lid/door I gave them 3 coats of Helmar Decoupage & Craft Paste to protect it and decided when it was done I would give the whole project a coat of Helmar Krystal Kote Gloss Varnish.
I wasn't up to doing the stairs so did it on the back landing and the wind blew the fumes inside the house so my advice is don't do it next to a open window or door.  :)


When working on the last door I noticed that the MDF at the bottom 4 inches had mold through it so I treated the entire door with vinegar, gave it a extra coat of paint and made the decision to use the Helmar Krystal Kote Gloss to seal the bottom of the doors so the mold spores would hopefully remain sealed in.


Here are some close ups.  I love how the Helmar Krystal Kote Gloss gave the project a beautiful gloss finish.

I was unable to get the laminate off the sides so I have given the sides and the trim between the lids and the doors a coat of paint.  When I have 2 helpers who can lift the entire cupboard downstairs for me I will coat the entire cupboard in Helmar Krystal Kote Gloss  to seal the spores but hopefully the paint and vinegar treatment will be enough.


I love how this project turned out.
I know that using Helmar means this project will stand up much better to the high use it is going to get.


I am so glad Helmar supported my idea of tackling such a big project.  I learnt some very useful things while doing it and it is a very fun piece in our craft room.