Showing posts with label Papercraft. Show all posts

Tuesday, 1 November 2016

Super Mario Brothers Birthday Invites

Mr E has been rather indecisive regarding his 10th Birthday Party and with just 6 days to go asked for a Super Mario Party, I was planning on just doing basic invites up quickly now that I finally had a guest list from him but as I scrolled Pinterest for DIY decoration inspiration Mr E spotted these cute exploding box invites as he looked over my shoulder and asked me to make 20 while he was at school that day so he could hand them out the next morning.
I went with simple decoration on the invites due to the limited time I had to create them, the kids loved them and were so excited to recieve them from Mr E.


Here are the cutting and scoring measurements but I recommend watching the below video to see how the process worked.
Cut the cardstock to 9 1/2 x 6 3/4 inch. 
Score at half inch on one side then flip and score ever 2 1/4 inch. Turn 90 degrees and score every 2 1/4.
Then selectively cut on the score lines to get the needed shape.


I don't think I will get much scrapping done this week but I am looking forward to creating things that suit a party in a park that are Super Mario themed.

Saturday, 6 August 2016

4 Pocket Letter swaps Mr E did.

Mr E wanted to do some more Pocket Letter Swaps.  I just realised I hadn't shared what he created with as little help from me as possible.  I will post what he recieved asap.

Mr E picked out the papers and most of the bits, I like his colour coordination.


For a music loving young lady he had fun with some paint sprays colouring some old sheet music.


I love the Gramaphone charm he chose to include.


Some simple circle punch flowers made from sheet music, I helped with the paper piercer to put the brad in.


For the 2 Pokemon themed Pocket Letters he wanted to send to sisters that love Pokemon he wanted me to help him make a punch art Pikachu for one and a Punch Art Tree I made for my Easter swap for the other, which gave me the opportunity to film the Tutorial that was requested.


He also wanted me to make a Origami Pikachu Bookmark for each girl and to include a Rainbow Loom Pokeball Charm for each girl.


He place the Origami Pikachu Bookmark in so his head was poking up from the grass but his back was visible from the back.
Between each Pokemon card at the back and the handmade cards at the front little treasures were inserted to find.
He included other goodies in the envelop and some had to be taken out due to how they affected postage.
Mr C drew each girl's favourite Pokemon and Mr E coloured them.  I found these Free Printable Bookmarks and printed them on a sheet from a visual art diary for better thickness.  The little pokemon had to be left out as they impacted how the envelop measured.

Saturday, 21 May 2016

Upcycled Fauxdori Traveler's Notebook from Enid Blyton Book

My lovely friend Alicia loves Enid Blyton so when I found this very damaged Enid Blyton at a op-shop that had torn pages, scribble in marker throughout, etc I knew just what I was going to do with it.
I carefully removed the pages, ran some strong wide tape down the inside of the spine, lined the inside with some scrapbooking paper, used my Crop-a-Dile to set some eyelets and a piercing tool for the middle hole.
I am pleased with my first attempt at upcycling a book into a Fauxdori.

I found this dragonfly charm and attached it to the elastic as it had pink beads and she loves pink.

The paper has a distressed feel that suited this rather distressed book.

I am now on the look out for more books that will suit this type of project.

Friday, 8 April 2016

Kaisercraft Off the Wall - Rad Sax

I have wanted to scrap this photo of Mr C in his early days of learning to play the sax for some time, I felt Kaisercraft Off The Wall was the perfect range for this photo but I needed a little red.

I used
Kaisercraft Off the Wall - Rad
Kaisercraft Off the Wall - Collectables
Blue and Red Cardstock
I recommend laying things out before you do any cutting or adhering.
Laying things out allowed me to decide if I needed to add paint to the background paper, more cardstock, punch out some stars and so on without wasting product if I wasn't happy.
I decided some splats of red paint were needed so I did a practice one behind where the photo would go just in case.
I was happy with the results.
Then when I did the others they just didn't turn out how I wanted them.
The climate of my home has resulted in my red paint dabber solidifying quiet badly, I added a small amount of water but this did not help, I can only get a watery mix out so it is only suited to splats or smudges.
 I wiped the splats with a baby wipe to get a similar effect to the swiped look of the paper.
 I love this paper but as my favourite local shop was severely damaged in a storm I can't replenish my stash until I travel out of town and see if another shop has some still so I decided to cut some out from behind my main feature and save some for another layout just in case I can't get anymore of this sheet.
When it came time to adhere, I adhered each section of embellishments together and set aside and then adhered the clusters down.
I am very happy with the end results.
This was a quick layout to put together so great for those of us with lots of scrapping to do in a short amount of time.

Thursday, 7 April 2016

Easter Pocket Letter Swap

I really enjoyed making this Easter themed Pocket Letter.

The tree is a simple punch art tree and I will be uploading a video tutorial for it shortly.  I will edit and add the link once it has uploaded, depending on internet upload speed it should be up within the week, so please check back and watch it if you wish.
I was careful when adhering the circles that they didn't prevent accessing the pockets.
I cut the tree trunk after adhering it at the opening of the pocket so items in the pocket could still be accessed.
The hillside is torn green cardstock, the grass is the same green cardstock as the tree leaves and the hillside, I die cut it with a Cuttlebug  Grass Die, the leftover cardstock I cut in some grassy shapes between the sections of die cuts to get a longer piece for the bottom.  I coloured the grass with a lettuce paint dabber, I also used this paint dabber to edge the tree leaves.
The tree leaves, hillside and grass used only 1 sheet of cardstock.


 In the back of each pocket I used paper scraps to decorate and added various Easter themed items or items in a similar colour scheme. 
This tea was the perfect colour.
The shaker pocket is a single collector card card pocket sealed with Washi so if Megan wishes to use the bits she can open it and use them.
These sticky notes were the perfect colour to add in, I trimmed them down with my 12 inch trimmer so they would fit.
 Here is the Easter Pocket Letter I received.  I love all the extra bits included, they will be very handy for Easter next year and various craft projects.
I am going to use the Bookmark in my Textbook to give me something cheerful to look at.
Unfortunately part of the fence came off in transport, I just found it when sorting the supplies.


Saturday, 5 March 2016

Pocket Letter Pals

I can now share some of the Pocket Letters Mr E and I sent last year as I have heard back that everyone got theirs.
I will also include the ones we received.

Firstly Mr E loves getting mail so when I found this new concept in Happy Mail I jumped on board.  I asked in the Australian group if anyone had children that would like to swap with Mr E and 1 person did and a few others wanted to send him a Pocket Letter.

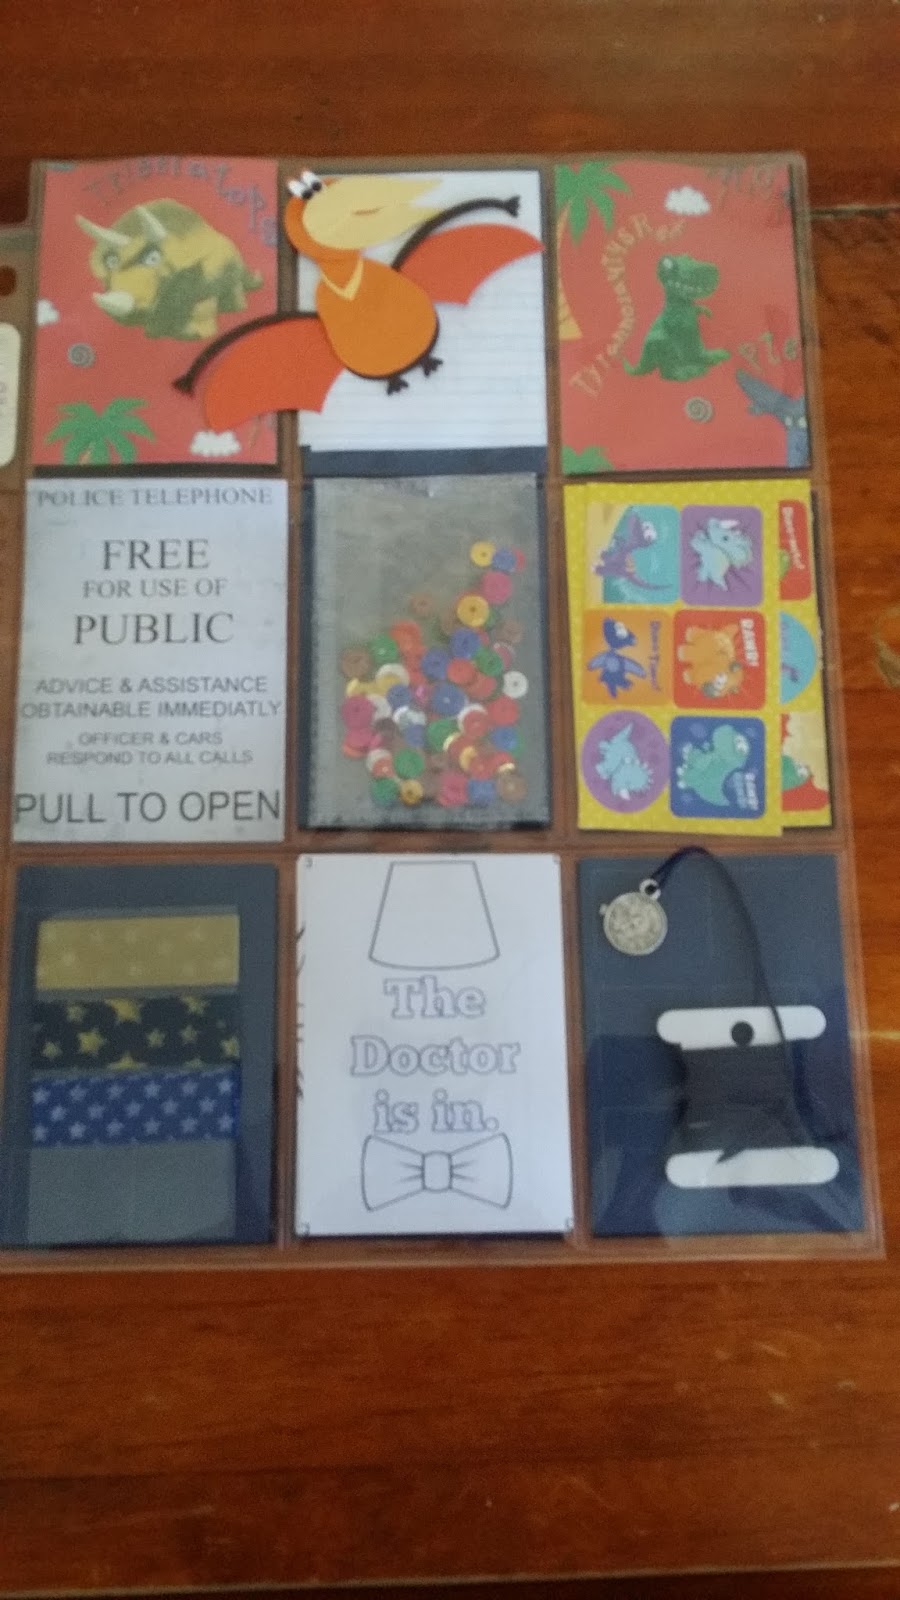
He loves Dinosaurs and Dr Who among other things so he went with a theme that represented the Dinosaurs on a Spaceship episode to combine 2 of his favourite things for 2 of his Pocket Letter Pals as they were Dr Who fans and a Dinosaur theme for the other 2..


Mr E received this lovely letter from Maria's son, full of die cut dragons and dinosaurs.
He loved it.
Karen sent Mr E this fantastic dinosaur themed Pocket Letter.
The Dinosaur has texture to it, he loves it so much.
Her granddaughter drew him a picture of Ash which he treasures.
He loved getting mail.

Mr E received this Pocket Letter with a Lego Mini Figure from Amelia.


Now for what Mr E sent.   He wanted to make a punch art Pterodactyl for each Dinosaur and Dr Who themed Pocket Letter, so I had to figure out how to make them and then teach him it so he could make them himself. 
For his Dr Who themed Pocket Letters he made a Galaxy painting on some black cardstock.
He also included a Watch charm and a Sonic Screwdriver charm in his Dr Who themed Pocket Letters and a Dinosaur charm in his Dinosaur themed letters.
He had so much fun making these, and often asks me when he can send/receive mail again.

For Karen he decided to not go with a Dinosaur theme and chose some paper from my stash and selected things with similar colours to add into it.


Karen kindly included a Pocket Letter for me with Mr E's letter, my first Pocket Letter, Yay :D
I love reading the notes.


Here is my very first Pocket Letter which I sent to Karen.  I had so much fun making this.

I asked in the group if there were any Firefly fans and 2 ladies responded that they would love to do a Firefly themed swap.  One is still on it's way to me but here are some pics of the amazing Firefly Themed Pocket Letter Trina sent me. 


Here are the Firefly themed Pocket Letters I sent. 
I used some vintage lace from my Mum's collection to wrap around the Pocket Letters to hold them in place for the mail but I also cut off a small piece and put it on a coathanger paper clip to represent Kaylee's dress.
I included various charms on some orange embroidery floss attached to the binder holes (from memory a book, teddy, dinosaur and coat).
I painted Galaxies with Mr E with these Pocket Letters in mind.
The pink sticky notes reminded me of Kaylee's dress so I had to add some.


Wednesday, 10 February 2016

Altered Book

I loved a Listers layout that had bookpaper as the background and thought I haven't started this year yet so why don't I alter a book so I can use it for my lists.
So I chose this book that was missing a couple of pages.

I decided to experiment with altering directly onto the paperback cover rather than adding cardstock or paper to it first.
I applied 2 coats of Gesso and then stencilled with Gesso again.
Once dry I applied a home made paint spray and it started to crinkle up.  I quiet like the effect but I lost most of my stencilling.
I had at least 20 different ways I wanted to do this book.  I prepared multiple chipboard pieces, from cogs that I made look rusty with paint, to the end result of some swirls that I used blue and silver paint on to coordinate with the broken piece of necklace that I added some charms to, I also added wood veneer bird and bird cage to the cover and some paper flowers.

To use the book I am gluing 2 pages together and removing 2 pages between each lot of glued pages to allow for chunky creativity.


After the first layer of Gesso.


Here is the back.   You can see the small amount of stencilling that partially remained.


What do you think of the finished cover?
I can't wait to get listing in this book.