Tuesday 29 May 2018

Making Ezra Bridger Gloves

Mr E asked that Ezra Bridger from Star Wars Rebels Season 1 be his first cosplay that he makes himself.  As we are novices to sewing and prop making we decided that we should start with the easiest part of the costume first.

Before starting we did some research online including reading  blog, joining the Replica Prop Forum and asking a member of the 501st for hints; he told us to add CRL to our search when searching for info on any Star Wars cosplay, I am so grateful for that hint but the reason I am grateful will be revealed in a later post as it isn't about the gloves.

As this is E's first time making a costume we wanted to keep it simple but also have it be a journey in learning skills he will need to make other costumes, so we chose the gloves as a starting point as he could make them very simply with some Green Fingerless Gloves from Best & Less and add a triangle of Light Green Felt glued to the back of them with Helmar Fabric Glue.


I used some scrap packaging inside the gloves in case the glue went through the fabric, though the glue did not go through which was good, I would still take this precaution if doing it again.

To get a approximate idea of the approximate size the triangle of felt needed to be.
I cut a triangle to this size and then trimmed down as needed.


E applied the Helmar Fabric Glue to the underside of each triangle.
A 2 handed job due to his hand issues but a good way to help build his hand strength.  I love it when a craft supply is useful for his Occupational Therapy.

He set the gloves aside to let the glue dry.


And here are the finished gloves.
He is so happy with how they turned out.


This was a great way to get him crafting for his costume without feeling overwhelmed.

Next project is Ezra's jacket.

Sunday 27 May 2018

Strong - Scrapping Fun Kits Design Team - Scrapbooking on the Train

When I was packing for a trip on the Tilt Train with my son for his Rheumatology appointment I knew I would take my TN set up but that I wanted to add all the flat pieces from the May Fundraising Kit to it as so many of the photos I currently am working with are of our EDS journey.

The first photo I chose to scrap was this photo of C having his first trip to the park using his wheelchair.  I journal about how the wheelchair gave him more independence and how important that was.


Having cut my tissue paper into strips made it even easier to scrap on the Tilt Train as those tray tables are very small so the less I needed to to do pull a layout together the better.  The only cutting I did was my photo and I just tore the length of the tissue paper to shorten it.
I had scraps of the gorgeous blue paper from another layout with me so I used one of these as a matte for my photo.  Adding some of the blue butterfly washi to the layers behind the photo.

I repeated things a little on the left with the left over piece of tissue paper and some of the washi and I added the left over piece of the cut file that says strong to that cluster as my title.  Ideally I wanted my titled to be Independence but I had to work with what I had and strong did seam perfect for the photo I was using.

I took some clearer photos once I was home.

I love how the layers turned out on the left, you get to see more of what is hidden behind the photo and it just pulls the layout together.


I love the torn effects of the tissue paper, and the little butterflies on the washi tap.


There are still a couple of the May Fundraising Kits left so if you would love one of these kits head to the Subscription Tab and fill in the form or email scrappingfunkits@gmail.com

Scrapping Fun Kits is fundraising for Starlight Children’s Foundation this month. All profits from sales of the May Embellishment Kit and kit extras will be donated to Starlight Children’s Foundation. If you would like to donate directly to Starlight Children’s Foundation you can do so via their website https://starlight.org.au/donation-form

Monday 14 May 2018

Explore Space Canvas - Helmar Creative Team

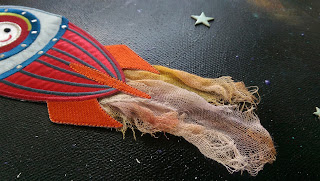
I wanted to do a scrapbook layout with a galaxy background and using this cute iron on patch set from my stash and some chipboard stars to build dimension to the layout.  It quickly changed to me reusing a old canvas that the kids tried to paint a Christmas tree on years ago to create a item suitable for wall decor for a child's room.
I love painting Galaxy/Nebula paintings as the technique used is one that I am able to easily do with my hand issues.

I started by coating the old canvas with a coat of Colour Blast Heavy Black Gesso, I got great coverage from this Gesso.

While the Gesso was drying I coloured some gauze in the colours I wanted the nebula to be as I wanted to experiment and see if I could add it to the painting to give the nebular dimension. 
I simple dabbed some distress ink on my craft sheet added water and rubbed the gauze in it.  I repeated with some Colour Blast Mica Powder in Wisteria.
There are not photos of this attempt as it really did not work so the gauze quickly became another aspect of the piece.

Once dry I wrapped some space themed washi from Scrapping Fun Kits around the outside of the canvas on the edge using Helmar 450 Quick Dry Adhesive to ensure a strong stick as the adhesive on the washi would not be enough to get a long term hold.


Next I started working on my Galaxy but gradually sponging coloured paint onto the canvas in a sort of nebula shape.  I used some old paints in red, yellow, purple, blue and white.  I blended the red and yellow together where needed to get hints of orange.
Then I flicked paint with a brush all over the canvas mainly in white but also some of the blue and purple to add to the space effect.


Once the paint was dry I adhered some of the coloured gauze behind the rocket ship patch then I adhere it and the planet patch that came in the set to the canvas with Helmar 450 Quick Dry Adhesive.


Finally I used the last of my Studio Calico chipboard stars I got from My Scrapbook Room randomly on the canvas using the Helmar 450 Quick Dry Adhesive.


Once everything was dry I gave the entire thing a coat of Crystal Kote Gloss Varnish to seal it all and protect it.  I sprayed a bit closer in some spots to see how that would affect the finish, I was hoping it would enhance the night sky feel of the piece and it did.


I love how it turned out.


Zebra Strong - Moodboard Challenge - Scrapping Fun Kits DT

The May Moodboard is inspired by my and my children's journey with Ehlers-Danlos Syndrome, Fibromyalgia and ME/CFS so I wanted to document part of that journey for the Moodboard Challenge.


I chose this photo of my hand taped to stabilise my finger that keeps dislocating. 

I used part of the paper from the May Fundraising Kit (note my colour is slightly different to the rest of the team and the customer kits as my copy was a misprint), a strip of the zebra tissue paper which I tore at each end layered on top the blue butterfly paper to mat my photo with.
I cut my photo in 2 and trimmed a little off so it could be spread over the 2 pages in my TN.

I then journalled on my page about how the taping helped reduce the frequency of my finger dislocating.

A quick layout but I love the results.

Scrapping Fun Kits is fundraising for Starlight Children’s Foundation this month.  
All profits from sales of the May Embellishment Kit and kit extras will be donated to Starlight Children’s Foundation.  If you would like to donate directly to Starlight Children’s Foundation you can do so via their website  https://starlight.org.au/donation-form

If you would love to have one of these kits or a mini kit head to the Subscription Tab and fill in the form.  For mini kits add the word mini into the promo code box.

Friday 11 May 2018

Starlight Day 2014 - Scrapping Fun Kits Design Team

On Starlight Day I was inspired to scrap some photos of my daughter volunteering on Starlight Day for the first time in 2014.
Fundraising and Awareness raising has always been important to my daughter and after becoming very ill at 15 Starlight Children's Foundation provided incredibly important support to her so once she was well enough she decided to volunteer on Starlight Day and since there was no one organising in our area she took on that roll and rallied some friends to help.
They had a lot of fun dressing up and being entertaining to attract people to come over and see what it was all about.  They had a stall at the Hertitage Markets on the Thursday and our local Woolies allowed them to set up out the front on Starlight Day itself.


So back to my layout.  I pulled out any bits from the May Fundraising Kit that were purple or could be coloured purple and then I added supplies from the September 2017 Kit and a gorgeous 6x6 paper from Violet Silence by Lemon Craft.

I played around with a few bits until I had a vague idea of how I wanted to do things and then I went searching for alphas for my title.  I chose these old Thickers that you colour yourself.
To colour the Thickers I used some  Distress Ink and some Colour Blast Mica Powder in Wisteria.  I started by using my aquabrush to apply water to each letter in the shaped of the letter then picked up the yellow and added it to the water, then I added the wisteria.  I knew these colours had a strong chance of going muddy but I really wanted letters that were a yellow and purple watercolour effect.  Things were looking good and it was nearly dry so I decided to give it a light dab with a cloth and most of the colour came off, so I added more and that is when things got muddy.  I added a little more wisteria and I am happy with the results.
I had really wet these alphas so I wasn't able to finish my layout on the day as they needed to dry and I only have a small window of time to create each day.
Due to the colour coming off if I dabbed them I decided to seal them with Helmar Crystal Kote Matte Varnish once dry.

I love how they turned out.
I coloured the die cut from the May Fundraising Kit using the ink and mica powder.  I started with a layer of the ink then added the mica powder once dry.  It came apart a little which was really hand so that I could spread it around my photo.


I used the packaging technique with the left over colours on my craft sheet each time to colour some white cardstock.  Once dry I cave it a coat of Helmar Crystal Kote Matte.

Scrapping Fun Kits is fundraising for Starlight Children’s Foundation this month.  All profits from sales of the May Embellishment Kit and kit extras will be donated to Starlight Children’s Foundation.  If you would like to donate directly to Starlight Children’s Foundation you can do so via their website  https://starlight.org.au/donation-form

Tuesday 8 May 2018

NSD with Kitaholic Kits - 10 Minute Challenge

I had 3 wonderful Cyber Crops to attend over the weekend for National Scrapbooking Day, I intended to create each day over the long weekend but things didn't go to plan so inspired by the various challenges I promised myself early Monday morning I would pick something from each NSD event and create it at some point over the next 2 weeks.  Kitaholic Kits 10 minute challenge felt like the perfect challenge for someone who had very limited scrapping time and since I usually knock out layouts in 15 to 30 minutes I was hopeful of success.  As you will see when you watch the video that timer ticking down makes a big difference.

I decided to use one of my Kitaholic Kits from 2017, I can't remember which month this one was but it was the kit that had Cocoa Vanilla Wild At Heart items in it.

As I included my pre-sorting of supplies in the video it wound up too long to upload with my internet speeds so I have edited down the pre-sorting of supplies. 


Here is my finished layout.  I really love how it turned out.


How cute is the Memorymaze chipboard piece?  It worked perfectly with the supplies from my Kitholics Kit, especially with the pale purple ink I coloured it with.  Total fluke that the colour matches the little crochet flower.
A quick cluster using 2 of the die cuts pack that was in the kit from Kitaholic Kits and a butterfly bead from a old Scrapping Fun Kits embellishment kit.


If you would like to join in head to Kitaholic Kits Community Group.

Saturday 5 May 2018

Strong Man - Scrapping Fun Kits DT

The wood veneer Strong in the Scrapping Fun Kits May Fundraising Kit was just the prompt I needed to pull out the photos from this wonderful night and record this story.


The paper from the kit was the perfect mat for drawing the eye to E as he was wearing a blue shirt.
I built my layers with a strip of the zebra tissue paper from the kit and this cute doodle paper from a Kaisercraft #Me 6.5 x 6.5 paper pad.  I also grabbed 2 borders from this paper pad and a die cut arrow and circle.  And for my background I used a sheet of Echo Park Soccer Words Paper.

I partially matted my ticket on a scrap of black cardstock to help it pop and give some protection to the rest of the layout if the acid and lignin in the ticket become a issue at a later date.

I adhered the sweatband he wore as part of his costume down with some Helmar's 450 Quick Dry Adhesive on the back.


I divided the Beautiful die cut from the cut apart in the May Fundraising Kit into 3 pieces and tucked it behind various layers in the layout.  It added just the right amount of blue to the right hand side of the page and some cute dimension.

The arrow from the 6x6 paper pad was a great way to ground the wood veneer from the kit, I also pointed it towards my son in the photo to draw the eye to him.

I love how this layout turned out.  The orange and blue worked really well together.

Scrapping Fun Kits is fundraising for Starlight Children’s Foundation this month.  All profits from sales of the May Embellishment Kit and kit extras will be donated to Starlight Children’s Foundation.  If you would like to donate directly to Starlight Children’s Foundation you can do so via their website  https://starlight.org.au/donation-form

If you would like to order one of these gorgeous kits or a mini kit head to the Subscription Tab and fill in the form.


Thursday 3 May 2018

Making Reusable Items for Earth Day

This year for Earth Day the boys and I decided to make some reusable items to reduce the amount of disposable things we use in our home.
We upcycled some flannelette pajamas into reusable make up wipes and upcycled old pillow cases into shopping bags.  


For the Reusable Make Up Wipes.
We started by tracing around a glass with a pen on one of the pant legs of each pair of pajamas so we had 20 circles on the women's pair and 10 circles on the child's pair.


We took it in turns using the sewing machine to stitch zigzag stitch around each line.

We are novice sewers and are learning together, we found sewing the make up wipes great practice for sewing curves which will really help with our upcoming cosplay sewing.


Once we had stitched all the circles we cut them out as close to the stitching as we could without cutting into the stitching.


And here are our finished Make Up Wipes ready for use in a clean Vegimite jar.

I have plenty of the pajamas left to make some dish clothes with or more make up wipes depending on our needs.


For the Pillowcase Bags.
I found a couple of guides online but decided to things a little different while still using their technique.

I folded the pillowcase in half length-ways as the instructions I found said but when drawing my handle pattern I put them at the end of the pillowcase that doesn't open so I wouldn't have to piece them together.
I put my ruler about 3 inches in from the side and drew a line 20cm down the length, then I moved my ruler to the outside and marked where 25cm was and joined this to my line with a curve.  I repeated on the other side so when I cut out I have a handle ready to hem.

Once they were cut out I turned them inside out and hemmed the handles by just turning about 6mm in on each side.

I then closed the bottom with a straight stitch which I then reinforced by stitching over it with a zigzag stitch, stitched the corner on a diagonal and snipped the corner off before turning right side out.

One of my pillowcases had a hole in the middle so I used the scraps from cutting the handles to patch the hole.


Once I turned the bags right side our I checked they would hold a lot of cans and they do so I am really excited to use my new shopping bags.


I have kept the left over scraps from making the bags to use as small rags when doing mixed media projects, so there is no waste which is fantastic.

May Challenge List

Welcome to the May Challenge List.  
I will continue to update the Challenge List as more challenges go up throughout the month, so please check back regularly and see what wonderful challenges have been added.

Due to positive feedback I will continue to split the list into Australian based challenges and International challenges, so make sure you scroll through and check out all the wonderful challenges as many allow entries from all over the world.
Please if I have put a challenge into the wrong catagory let me know, I worked hard to be correct but we can all make mistakes.

Please if there are any Challenges you are aware of that I have missed let me know.I am really loving participating in Challenges, it is getting me to craft more often, to do projects I may otherwise save to do later, and some there is the added challenge of completing them when I have limited supplies that meet the requirements but that just adds to the fun.
So now for the list, I will provide a link to each challenge that has a direct link for it and either their Facebook page, website, shop, whichever is appropriate so you have all the details you could possibly need.
Those that are in a Facebook Group I will link to the group, please contact admins of the group to let them know you are joining to participate in the challenges or look at the challenges as some admins have requested this due to the waiting list. 

Scrapping Fun Kits has a special Awareness Moodboard for their May Challenge.


White with 1 is a fun shade of pink this month and a moodboard to help inspire you.  Here is their Facebook Page.


Scrapping Good Time - Scrapbooking Group Australia is a Closed Facebook Group that has multiple Challenge each month.  This month they are having NSD Cyber Crop.

Kraft+ Challenge has a wedding theme this month, make sure you head to their blog and read the requirements for this one. Here is the Facebook Group.


Scrapbooking Top 50 Australia has a fun sketch this month.  Head over to the blog for inspiration and details


Anna's Craft Cupboard has a lovely colour challenge this month which you enter either via a Online Gallery or their Facebook Community.


Off the Rails Scrapbookinhas a fun moodboard this month.  Here is their Facebook Group.  Make sure you check their blog for the rules of their Challenges. 


Aussie Scrappers Society is a closed Facebook group that has challenges.

Scrap the Girls has a fun Moodboard this month.


ARTastic has a lovely artwork this month.  Here is their Facebook Page.


Aussie Crafters is a Closed Facebook Group that has a monthly challenge and swaps.  Please pm the group owner when you request to join. 

Scrap the Boys has a fun moodboard this month. Here is a link to their Facebook Page.  Make sure you check their blog for the rules of their Challenges.


Use Your Stuff is a great weekly challenge that is all about using the stuff you have.  


Archi-scraps has a fun prompt this month.


Show us your stuff has a fun tic tac toe this month.

Sketchy Boards Challenge has a great Sketch and prompt this month and a fun prompt this month.  Follow the link for inspiration and rules.


Scrapping Clearly has a fun sketch and moodboard this month.


International Challenges


CSI Challenge - Color, Stories, Inspiration is a fun challenge formatted as a case file for you to do.  
They are also having a Design Team Call this month.


Counterfeit Kit Challenge is a great concept where you take inspiration from a new kit that is out and create a kit from your supplies using that inspiration and so create layouts with your own kit.  They do a blog hop with their team showing each person's kit and layouts.  Well worth checking it out. 

Lasting Memories Scrapbooking Challenges have multiple challenges each month to inspire you.

More Than Words has a great prompt this month.  Here are the Rules for their Challenges. Here is their Facebook Page.


Craft-Dee Bowz is a monthly challenge that involves using a bow.  Head to their blog for more details.

Maja Designs also has a beautiful moodboard to inspire us this month.


Creative Inspiration is a online forum/group that features multiple challenges throughout the month.


Crafty Creations Challenge is a bimonthly craft challenge.  Make sure you read their rules as entry closing dates are different to most challenges.

Pixel Scrapper is a Digital Scrapbooking community that has a monthly challenge.  I am so glad I found this wonderful community. 


Stick it Down has 3 Challenges a month, a card sketch, a single page sketch and a double page sketch.  Head to their blog for further details. 

Rochelle Spears has a new Sketch Challenge. 


Scrappy Land is a bimonthly challenge that is all about getting out those dies and using them.  Make sure you list  the brand of die you used and that it is one their store stocks.


Scrap Our Stash has a fun prompt this month.


Project Life

Here is a list of Challenges that would suit creating Project Life layouts.  Note I do need to check the challenges that are new to the list and update this sublist.  I will update shortly.

Scrap the Boys have said they will accept PL layouts.
Scrap the Girls have said they will accept PL layouts.
Kraft+ Challenge accepts tradition layouts, art journalling, tags, etc so this challenge would suit PL I think.
ARTastic Challenge Blog accepts all forms of Scrapbooking as entries.

Scrapbooking Top 50 Australia accepts PL entries.
Show us your stuff accepts PL entries.
Scrapbook Boutique accepts scrapbooking, off the page, etc so I think it would suit PL.  The new challenge is posted on the 10th of each month.
Dusty Attic states in the August Moodboard Entry Rules (so assuming it is the same) that your project can be anything you desire including layouts, cards or off the page so it sounds like PL will be accepted.

Previous Lists


My scrappy friends who only scrap when at a crop, or who have stopped or reduced their time scrapping for any reason I think you will love some of these, have a look at each one.