Sunday, 31 July 2016

Sketchy Boards July Challenge

Beautiful colours and a lovely sketch from Sketchy Boards July Challenge this month.  I am so glad I managed to quickly get my take on this Challenge done, again finding myself with limited supplies that met the requirements for the challenge but that just makes it more interesting.
I intended to use some Embroidery Thread for the Circles, had it cut and ready to be adhered down to realise after my adhesive was dry that I forgot to add it but I am happy with my results.

Colours are showing up very well in the photos, possibly due to the time of day I have had to take them.


My background paper is from Ruby Rocket The Summerhouse Hot, hot, hot and I got the last sheet at my local shop.

The wider strips at the back are Dear Lizzy Polka Dot party, the darker flags are from the zip strip fo this sheet.
The other flags are from a scrap from K & Company Blue Distressed Flat Paper (it is more pale aqua than blue) that I saved when creating my D-lish Scrap June Inspiration Board Layout.


The beautiful paper that is the mat on top of the wider strips is from my only sheet of this lovely paper I found at a local shop from a company that I can't find on the internet the company is called Onirie, the collection was douceur de vivre  and the paper name quietude.  I found a expired online catalog and took a screen shot of this beautiful paper, oh I wish I had more.


The beautiful details on this paper.


Die cuts from Kaisercraft Kaleidoscope Collection suited this challenge really well.
I added in some hear punchies from my punchy stash, organge crocheted hearts from D-lish Scraps and gears from my local craft shop.


I hope to see some of you join me in participating in challenges, they are a lot of fun and great for getting more scrapping done.


Scrap the Boys July Challenge

Scrap the Boys July Challenge is Ocean themed.  I discovered I am rather lacking on Beach, Nautical or Ocean themed supplies.
Appologies for the different set out today but for some reason Blogger isn't letting me edit my post so that text is beside photos or to have photo clusters as I would prefer.

After I selected some papers from these paper pads I grabbed out some beads from a broken necklace, hessian ribbon and a cloud, sun and grass chipboard.
I started playing around with my papers, chipboard and hessian ribbon to work out how I wanted to lay things out before adding colour or other embellishments.

Then it was time for Distress Stains, I decided to go with more basic techniques this time, just swiping and then doing some splats with Tumbled Glass on my light grey cardstock.
I used Pealed Paint to colour the grass chipboard by putting some on my craft sheet and rubbing the chipboard in it and just dabbing on any spots that didn't take colour, I then inked the edges with New England Ivy CTMH ink and a ink dabber.
For the Sun I mixed some yellow, white and light brown Acrylic paints on my craft sheet and painted it on, once dry I dabbed some Mustard Seed Distress Stain on it.  I was trying to get a shade close to the shade in the striped paper I was using on my layout.
For the cloud I just dabbed white paint with a sponge on it to get a textured effect that felt like a cloud.
I chose not to base coat any of my chipboard as I wanted the different effect that the raw chipboard directly under the cover gives.
I had everything ready to adhere down when the oppurtunity to go to Spotlight and spend my voucher occured, so I grabbed a pack of charms that included fish and turtles and then I spoted a beautiful Mermaid Bookmark.  I had already decided to go with a overall ocean theme and use a photo of my son having Icecream at the beach on a day out with Dad.
In addition to my already selected embellishments I added some embroidery floss to represent seaweed.
I inked the edges of the papers with Pacifica ink from CTMH.
The die cut title is from that pack of Dear Lizzy die cuts I scored at the destash market, that pack is so useful.
I love the subtle colour from the Distress stain swipes and splats.
I also selectively cut some wording from one of the papers in one of the paper pads.

Tuesday, 26 July 2016

Jot Magazine July Mood Board and Aussie Crafters Pet Layout

I loved the July Mood Board from Jot Magazine when I saw it, it certainly felt warm, I have a small collection of yellow supplies and this was the prompt I needed to use them.

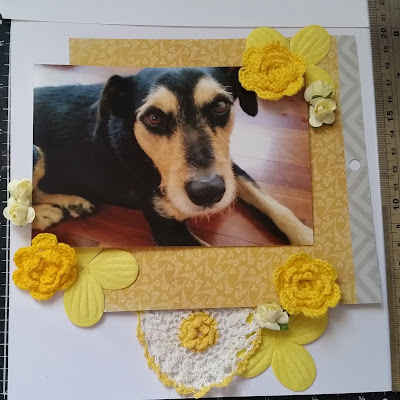
When I saw the prompt for Aussie Crafters July Challenge was Pets I knew I wanted to scrap Lola, I knew it would be sad to scrap this photo as it was taken the morning she passed away on July 4th 2016 but I wanted to create a layout of this beautiful dog that loved us for the last 2 years and 2 months of her life.
The love of a older dog is special.

I hadn't made much progress other than thinking about colours, papers and embelishments I may wish to use, however I had all my yellow supplies out for the Jot Magazine July Mood Board and her photo was on my desk near it I hadn't selected a photo for the Jot Magazine Mood Board yet and I was drawn to the need for the happiness and warmth of the yellow in the Mood Board to be around Lola.

For the Mood Board I had gotten out a collection of yellow embellishments, wood buttons to represent the woodgrain and cut part of a cute doily as I loved the yellow in it and the clothesline of white baby clothes in the Mood Board felt like a doily would fit.
I also added a sheet of lovely yellow patterened paper from the same My Mind's Eye 6x6 Designer Pad Unforgettable Heike gave to me for my Birthday.


As our Pet album is a 8x8 album unless it is a layout going into one of the kids 12x12 I did the ruler trick to see how it would look as a 8x8 layout and then tried 12x12.


I loved the extra space the 12x12 allowed but felt it was best to do this layout for the family pet album so went with 8x8.


The paper flowers were 4 petal flowers, I trimmed out the fourth petal to use at a later date on another project since it would be hidden from view.

I am going to include journaling on a tag that will be tucked in behind the photo as I adhered it in a way that would allow this in case I decided I wanted to do this later.  I couldn't make my mind up where to put the journaling so left myself some options.


Linked up over at http://www.simplysaidseven.com/nest-builders-link-up-party-11/

Sunday, 24 July 2016

Kraft+ July Challenge

When I saw the July Challenge from Kraft+ I knew this was a challenge for me.  With 3 of my 4 children playing instruments Sheet Music was an ideal challenge.

I decided I wanted to scrap my daughter touring with Elvis to the Max in 2014, however I could not get permission from all who were in the photo of her.  I really wanted to scrap part of her journey as a cellist so now the tough decisions was which photo to use out of 7 years of her 13 year journey.


I next settled on her performance in a local Sinfonia that was  quickly put together and had 6 weeks rehearsal to do a Mozart concert with world renouned Pianist Roman Rudnytsky.
I printed off the first sheet of one of the pieces played at the concert to be used in the layout and a copy of the A4 promo flyer distributed at the time and cut it up for the title and journaling.

I cut some pieces from a long table runner doily I have and created a bouquet of pink paper roses inspired by the bouquet on the board.


Then I heard back from my daughter as to which was the photo she would like to see scrapped with Kraft paper and pale pink, so I changed things and created my final layout.

So now that I am working with the lovely black and white photo taken by the Photography class at her Tafe when she was doing her Diploma last year I grabbed a sheet from Titanium that she performed with one of the Quartets she was in for a Year 12 assignment, tore it, layed it down on the Kraft and spritzed it with very pale pink paint spray which when dry is not very visible on the Kraft.


Adding this lovely pink paper from My Mind's Eye 6x6 Designer Pad Unforgettable given to me for my birthday by Heike, enhanced the pink paint spray on the sheet music.


I only used a single sheet of 6x6 paper, I selectively cut the paper to get the most out of it, as I love it and only have 1 more 6x6 sheet.


First I used some double sided tape to get the half flowers in place on the back of the pink cardstock, once this cardstock was down and then added some Glossy Accents under the half flowers to ensure they didn't move.

I also got some charms out from my charm stash to add to the title, bouquet and lace.

This charm with a bow of embroidery floss helped this space on the side of the photo.
I found this die cut in a pack I bought at the Destash Market last week which I am fairly sure is a Dear Lizzy die cut and it was the perfect title for what this photo represents.

I love the layers that are part of my bouquet, using the larger flower from the doily table runner under the bouquet added some dimension to it, the music note charm tucked in finished off this cluster nicely.  Underneath this and on top of the papers are 2 vintage pieces of lace from my Mother's sewing stash.
The top edge of the 6x6 pages from paper pads are great to include in your layout for that extra bit of colour and layer.
I was thinking about adding gesso to the background or more paint and inking the papers but I decided to go with a cleaner look.  I didn't want  to detract from the Kraft paper, sheet music or the photo.
I have since added journaling.

Friday, 22 July 2016

D-lish Scraps July Inspiration Board

I really love this month's Inspiration Board from D-lish Scraps I wanted extra of the gorgeous Rusty coloured Green Tara flowers in the July Just Add Paper Kit so I ordered 1 of the hearts, multiple of the flowers and added in some Apricot Gardenias these however are too orange for this month's inspiration board so I will save them for another layout that I want to do with the Orange Crochet Hearts I added to my order.
I just discovered the beautiful pack of Peach Azalea Pack, I wish I had grabbed them as they would have been perfect for this Inspiration Board.
For the peach tone I have gone with a tone closer to the ribbon on the album in the top right corner of the Inspiration Board.
I am so happy that I started doing Challenges as it is getting me creating more, though a big part of the challenge for me is so far many I have wanted to participate in including this one I don't tend to have many papers or sometimes any papers that are in the colours of the challenge so I am limited in choice and in a way that adds to the fun, seeing what I can create with limited choice.
Once my order arrived I shopped my stash for more embellishments that suited the Inspiration Board, I find it really helpful to get everything together that could work with a Challenge and then word from there.

When I saw that the Mother die cut from Kaisercraft Charlotte's Dream Collectables matched the Rusty Coral Lace Flowers I wanted to attempt to do a 8x8 layout for my daugher's pregnancy album.
The Love die cut match the peach items I had.
I grabbed out some of this vintage white lace from my mother's sewing stash.  I love that I get to use items from her stash in my layouts, it is a great way to treasure her things.
A Black Ribbon Rose for something black.
For Kraft I thought I would do some heart punches or a tag.


Next I grabbed out a pack of paper that has grey, white and black papers and I grabbed out my Kaisercraft Through The Looking Glass 6x6 pad as it had 2 lovely rusty red papers, a lovely grey and a paper with a sort of peachy/apricot orange and black pattern.


Experiment time.
I layed 2 rulers down at the 8 inch mark on my craft mat so I would have a idea of the space I had as I experimented with creating a 8x8 layout, this way if I decided to go with a 12x12 I hadn't cut the sheet of grey paper that has a really lovely subtle pattern.
I really like how this layout looks and wish I had double of the supplies so I could do both layouts that I experimented with.


Experiment number 2.
I really wanted to do a layout about how loving my boys are towards each other and I felt this Inspiration Board was perfect for that.
I decided to go with this layou as I loved the extra space of the 12x12.


I experimented with a rusty coral coloured fine tip pen with outlining my papers on just 1 edge of 3 of the papers so if I didn't like it I could hide the lines with embellishments and my photos.


I decided to add some more of the black twine to my layout, however the last spot I was adhering it the paper got damaged so I created another embellishment cluster to cover the tear.
 
I love the end result.
It has a few more embellishments than I intended but overall I feel it suits the photos of my loving boys.

Monday, 18 July 2016

Block Card aka Step Card for my Nephew's 1st Birthday

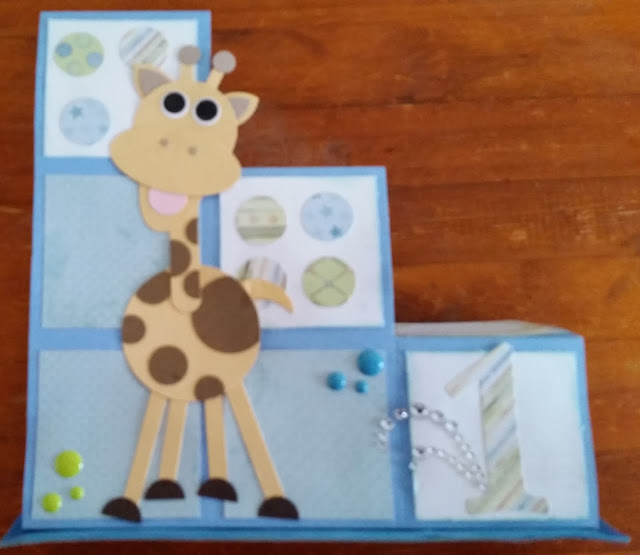
As soon as I saw Deb in Card-Making Australia's take on the Block/Step Card with a cute Giraffe on it and having the look of being a toddler's blocks I was inspired to make one for my Nephew's 1st Birthday including making a Punch Art Giraffe.

First I made my punch art Giraffe as his height would determine the size of the card.  I found this pin on Pinterest and proceded to figure out how to make him, then after finishing I discovered there was a tutorial.

Instead of using the flower punch for his ears I simply double punched with a 1inch Circle Punch.


I followed this tutorial from Janie for the base of my card however due to the size of my Giraffe I had to increase my size to 11.25 inches x 6.75 inches and score at every 2.25 inches.

My card was having issues standing up after a while so hubby suggested I reinforced it inside with cross pieces and add a base. I inked the edges of the chipboard base with a nice light blue pigment ink, covered the underside with paper and covered the edge that shows on the top with blue ribbon


I knew I wanted the number 1 to be a feature on the front so just randomly put dot stickers on the other 2 "blocks".  Some bling and enamel dots to finish off.

Wednesday, 13 July 2016

Aussie Crafters June Challenge

WARNING - possible triggers for people with eating disorders as weight loss is mention and numbers are mentioned.

My daughter has given me permission to share this with you.

When I saw the theme of the Aussie Crafters June Challenge (Mum), I knew exactly what I wanted to scrapbook - my daughter's pregnancy journey and her struggle with Hyperemisis Gravidarum (HG) but only one layout was needed for the Challenge so I focused on her first hospital admission.
Unfortunately something went wrong with both hard drives that I store photos on and 6 weeks of photos were missing when I went to get photos printed, which included these photos so I had to wait to get new copies or find a copy stored in another location so by the time I had photos printed for this layout and was able to start work on it the finishing date had passed.  I felt it was important to complete the layout and share it still though.

The Awareness logo for HG incorporates a butterfly so I knew I wanted to use butterflies in all her pregnancy layouts.   Purple is also her favourite colour so will also feature in the album.
I loved that she was wearing a Superhero shirt in both photos as women who endure HG really are Superheros, so I decided I wanted some black in the layout to draw your attention to her.
So I chose to use an old Kaisercraft range - Violet Crush, butterflies from my stash and some paper roses.
I decided to go with a 8x8 layout as I felt this would be a good album size for a pregnancy album.
Apologies for the poor quality of the photo, at this stage I was still using a 6 year old phone after my phone became a paperweight due to a fatal glitch when I downloaded a popular app.
I needed the letters HG in a large font in purple however I didn't have a die big enough and the only letter stickers big enough were white so I decided to colour them.
First I rubbed Distress Stain Shaded Lilac on the letters and wiped off the excess.  It absorbed into the edges which gave a nice effect.
Then I sprayed with Dylusions Spray Crushed Grape and wiped off the excess.


I wanted to show what HG meant so I typed up some words that are associated with HG and the wording regarding the difference Intravenous Fluids make to a patient in purple and printed them out.
I put the date of her being sent to A&E by her GP and her discharge date on a tiny tag and the date she reached 8weeks on another tag.
As I live 3.5 hours drive away I didn't get to her until she had had 2 days of fluids (the day she reached 8 weeks) as hubby had to arrange shift swaps so he could look after the kids and we had to figure out how to get me down there without taking the car, so the first photo is after 2 days of IV fluids and life saving medication.


If you haven't heard of Hyeremisis Gravidarum please make yourself aware of it, it affects 2% of pregnant women and can be fatal.  Awareness is essential so more women who are suffering can get the treatment they need.  So often we are fobbed off and the diagnosis is missed.
Please don't tell a woman who has HG to try ginger, or crackers, seabands, etc.  Everything that may help normal morning sickness has little to no effect on someone with HG and for many can actually make it worse.
Please don't tell a woman enduring HG to not take her medication, the medication is keeping her and her baby alive.
I now know this is what I had while pregnant with my eldest, despite gaining 13kg between 16weeks and full term my postbirth weight was 25kg less than my prebirth weight.
My daughter lost 12kg in 4 weeks, but thankfully has not lost anymore weight, though her weight has not gone up despite a growing baby bump.