Hello Ruby Rock-It Fans.
I am so excited to be sharing my first project for Ruby Rock-it with you.
Have you seen the fantastic Greenery Range? When I saw that grass paper I knew it was perfect for some grassy hills on a layout or even on a Table decoration.
And then I saw all the gorgeous new Crafter's Choice Bling and thought it was perfect for enhancing some die cut Easter eggs.
So these thoughts andmy love of picket fences informed my decision to make a picket fence basket decoration for my Easter table this year.
Ruby Rock-It Products:
Bella Magic & Wonder Gem MAW53Bella Cosmos Mantras CMS51
Various Crafters Choice Bling in pink and purple. I used Bling Flowers in pink, Bling Purple 3mm and Bling Borderlines Purple.
Mini Distress Inks in Hickory Smoke, Gathered Twigs, Aged Mahogany, Abandoned Coral, Spiced Marmalade, Pickled Rasberry, Victorian Velvet, Wilted Violet and Shaded Lilac. Or other colours of your choice.
Additional supplies needed
Popsicle Sticks
A sheet of Chipboard or other thick cardboard to make the base of the basket.
Helmar Premium Craft Glue
Die cutting machine or scissors to cut a bunny and eggs out of papers.Creating my basket
 To create my basket I made 4 picket fence panels out of Popsicle Sticks. Unfortunately I didn't get photos of the process of making the basket but I will talk you through it.
I simply laid down 3 Popsicle Sticks on my table and glued Popsicle Sticks with a slight gap between each one to them with Helmar Premium Craft Glue until I had a complete panel.
To make my Base I measured my panels and added 1 inch to this measurement. I cut a piece of chipboard this size and then scored a half inch all the way around and cut out the corner.
I glued my panels to my base with Helmar Premium Craft Glue and with some left over scraps of chipboard I created little reinforcing pieces in the corners high up the panels to ensure a good hold.
 Now it was time to prepare my pieces for decorating. I started by
tearing strips of the Greenery Grass paper keeping in mind I need to be
able to create a hilly effect with my tears.
 For my eggs I cut a assortment of sizes with my Silhouette Curio from 3 gorgeous papers from the Bella mini themes.
MAW 60 Magic & Wonder Stripe
MAW53 Magic & Wonder Gem
CMS51 Cosmos Mantras
I also diecut some smaller eggs with a manual die cutting machine and a Lawn Fawn die out of Glitz Cardstock in
 I wanted to colour my Bunny and white cardstock eggs with assortment of mini Distress Inks.
I simply dabbed each ink onto my craft mat, spritzed with water and used a brush to paint my colours where I needed them.
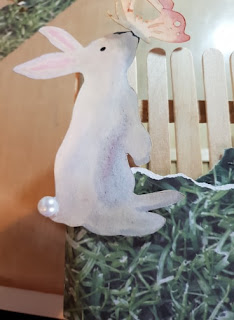
 I started with the butterfly and was hoping to leave the bunny white but the ink from the butterfly wound up going onto the bunny's nose so I then used coloured the bunny with Hickory Smoke and Gathered Twigs.
 Now it was time for bling. All that gorgeous Crafter's Choice bling.
I selected some pink and purple bling and cut off small sections to add to some of my eggs.
I love how they turned out.
 Starting with the bottom layer first I glued my grassy hills to my basket with Helmar Premium Craft Glue, wrapping them around the corners.
Finally I started adding my eggs randomly around my basket, trying to get a balance on each side as I went.
But first I decided I needed to stamp a couple of my eggs with the cute flower in the Happy Days stamp set.
But first I decided I needed to stamp a couple of my eggs with the cute flower in the Happy Days stamp set.
Thank you so much for reading my first Ruby Rock-It post.
If you would like to see more of my work you are welcome to visit my blog.


No comments:
Post a Comment